|
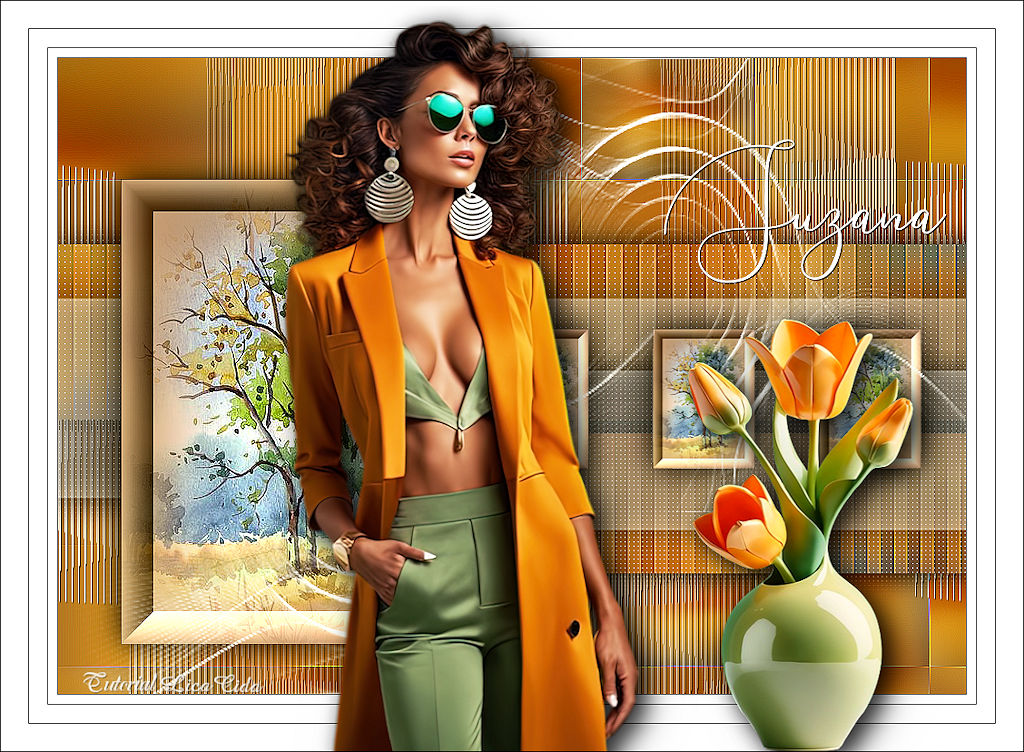
"Suzana"
MATERIAL AQUI
backinicial-lc
Tubes: KamilTube-939\ KamilTube-1096-Deco\nicole-mist-arbre-2015
NarahsMasks_1769\
titulo-lc
(Agradeço)
Marca D'água .
Efeitos do PSP.
PLUGINS
VM Distortion
Plugins Carolaine and Sensibility
Unlimited2 _Buttons & Frames.
MuR'as Filter Meister Copies
Tutorial
1-Abra o material no PSP, duplique e feche o original.
( não vamos trabalhar com cores específicas)
2_ Abra nova imagem transparente de 1000 x 700 pxls . Selections \Select
All. Edit Copy no
backinicial_lc \ Edit Paste Into Selection. Selections\ Select none.
( caso não queira a cor, colorize ou faça seu back )
3- Adjust\Blur\Gaussian Blur, 30,00.
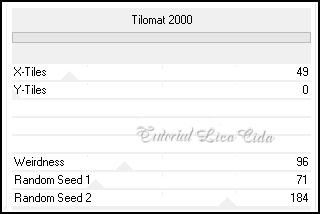
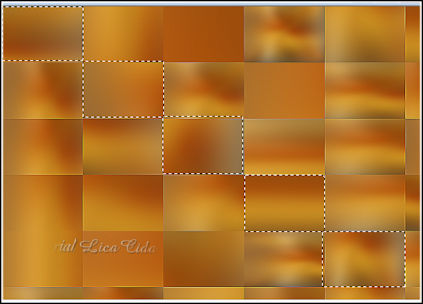
4-VM Distortion \Tilomat 2000.
*Effects\ Edge Effects\ Enhance More.
4- Ativar a ferramente Selection Rectangle.

5- Selecione como print.
Promote Selection to Layer
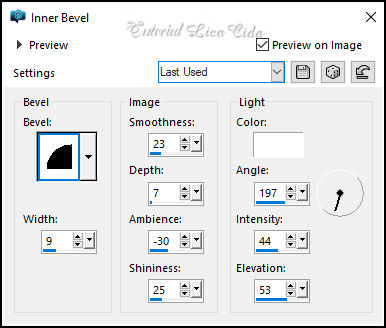
6- Effects\ 3D Effects\ Inner Bevel
Selections\Select none.
Layers Duplicate
7-Effects\ Distortion Effects\ Wave
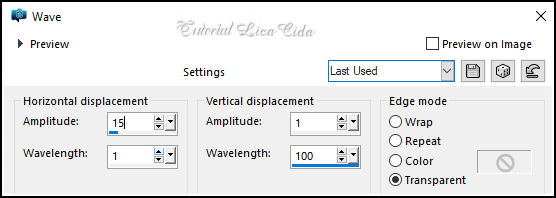
Image Mirror Horizontal
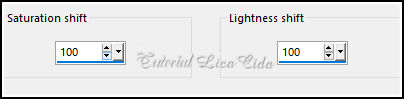
8-Adjust\Hue and Saturation\ Hue Map
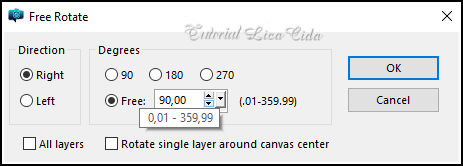
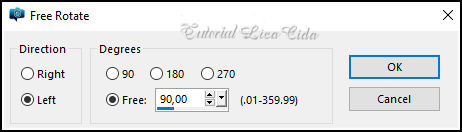
9-Image\ Free Rotate
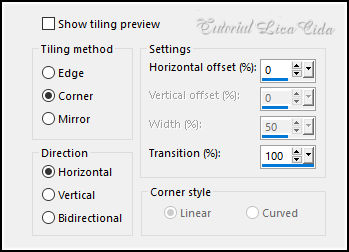
10-Effects\ Image Effects\ Seamless Tiling:
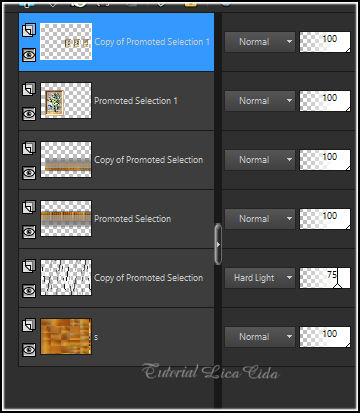
Layers\ Properties \ General \ Blend Mode: Hard
Light_ Opacity: 75%
Effects \ 3D Effects \ Drop Shadow: 1, 1, 100, 1,00, color #000000.
*Layer inferior _Promoted Selection _ Delete.
Raster1
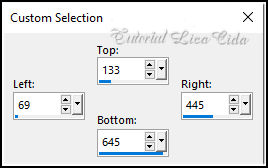
11-Seleção Personalizada ( tecle S )
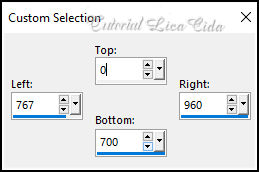
Promote Selection to Layer
12- Adjust\Blur\Gaussian Blur, 30,00.
Layers\Arrange\ Bring to Top.
13-Layers \ New Raster Layer. Flood fill \ Opacity 50%\ Preenche com
a color #ffffff.
*Layer inferior_Promoted Selection.
14-Plugins Carolaine and Sensibility \ CS-HLines
*Effects\ Edge Effects\ Enhance More.
Selections\Select none.
15-Layer Topo_Raster2
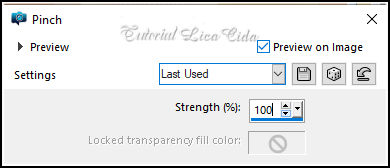
Effects\ Distortion Effects Pinch.
Effects \ 3D Effects \ Drop Shadow: 0, 0, 100,
50,00_ color #000000.
Layers\ Merge\ Merge Down.
Effects \ 3D Effects \ Drop Shadow: 0, 0, 100, 50,00_ color #000000.
16- Image\ Free Rotate
*Traga o efeito com a ferramenta pick tool, ao
final do back.
17-Plugins Carolaine and Sensibility \ CS-LDotes
* Layers Duplicate \ Resize 80%
Image\Mirror Vertical
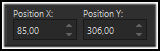
18-Pick Tool: Position X: 85,00 _ Position Y: 306,00.
Raster1
19-Seleção Personalizada ( tecle S )
Promote Selection to Layer
20- Adjust\Blur\Gaussian Blur, 30,00.
Layers\Arrange\ Bring to Top.
21-Layers \ New Raster Layer. Flood fill \ Opacity 50%\ Preenche com
a color #ffffff.
22-Copy no nicole-mist-arbre-2015 \Paste as New Layer. Posicione.
Layers\ Merge\ Merge Down ( aplicar duas vezes)
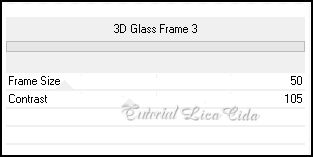
23- Unlimited2 _Buttons & Frames.
Selections\Select none.
*Adjust\One Step Photo Fix.
Duplicate\ Resize 30%
24-Pick Tool: Position X: 465,00 _ Position Y:
292,00.
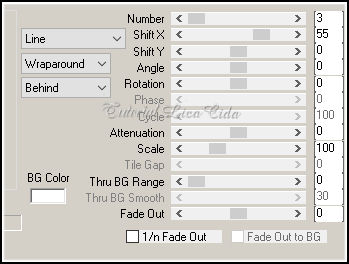
25- Plugins MuR'as Filter Meister Copies\ Line
Effects \ 3D Effects Drop Shadow: 0\ 0\ 100 \
50,00 .Color # 000000.
Layers\ Blends\ Opacitys
26-Copy no NarahsMasks_1769 \Paste as New Layer.
_Objects\ Align\ Right. Objects\ Align\ Top.
Duplicate \ Image\ Mirror Vertical.
_Objects\ Align\ Left.
Layers\ Merge\ Merge Down
Layers\ Properties \ General \ Blend Mode: Screen _ Opacity: 100%
27-Copy no titulo-lc \Paste as New Layer. Posicione.
borders
Image \ Add Borders \ 1 pxl color #000000
Image \ Add Borders \ 10 pxl color #ffffff
Image \ Add Borders \ 1 pxl color #000000
Image \ Add Borders \ 20 pxl color #ffffff
Image \ Add Borders \ 1 pxl color #000000
Image \ Add Borders \ 30 pxl color #ffffff
28-Edit \ Copy no KamilTube-939\ Edit \ Paste as New Layer..
Use a gosto, posicione.
29-Edit \ Copy no KamilTube-1096-Deco\ Edit \ Paste as New Layer..
Use a gosto, posicione.
Image \ Add Borders \ 1 pxl color #000000
Resize _Width 1024 pxls.
Aplicar a marca d'água.
Assine e salve.
File \ Export \ JPEG Optimizer.
Aparecida\lica _outubro de 2024.
::::...VOLTAR...::: |