|
|
|
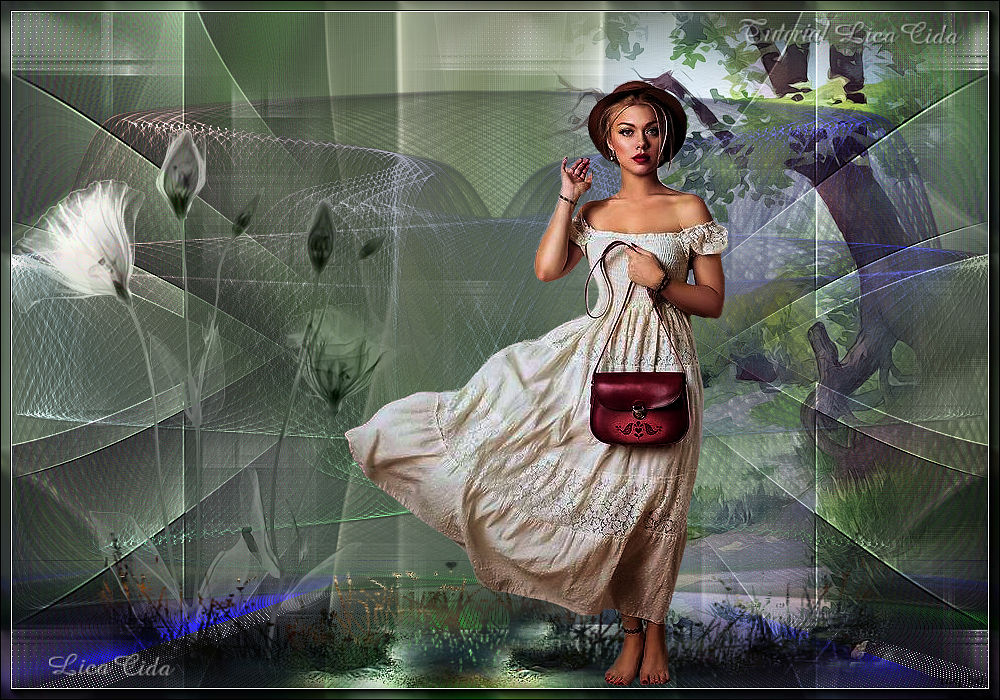
"Joaquina Mercedes" Com carinho!!!
Preset
Illumination\Lights_ curves (marapontes) ( Guardar em sua pasta
de Presets My PSP Files).
a-to-b.cfg__ "amaze" descompacte
o preset para a pasta de Plugins DragonFlay\ SinedotsII .
Abra o
sinedotsII_ open\ aparecem os presets. Tubes:
tube3228_mulher_mara_pontes\Paysage misted jewel 028\
anna.br_paisagem-by-rhigel.1_31-07-10\anna.br_transparent-flower_26-11-10
Deco:
deco1lc\deco -perspectivelc.
Mask:Mask_herbe
_efeitos anexados_
(Agradeço)
Marca
D'água . Efeitos do PSP.
Versão usada PSPX8.
Plugins
Plugin
FunHouse
Plugin
AbstractCurves ( anexado )
Plugins DragonFlay (anexado )
Plugin
Toadies
Tutorial
_Roteiro
Usar no foreground
 color=#d0cdcc e no background color=#d0cdcc e no background
 color=#524b55. color=#524b55.1-Abrir uma nova imagem
transparente de 1000 x 700 pxls.
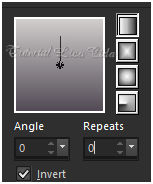
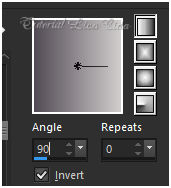
Preencher
com a gradiente formada pelas cores acima
. Configurar : Linear, Angle e Repeats 0. Invert marcado.
 2-Select All. Edit Copy Paysage misted jewel
028 \ Edit Paste Into Selection . Selections\ Select
none.
*Effects\ Image Effects\ Seamless Tiling:
Default.
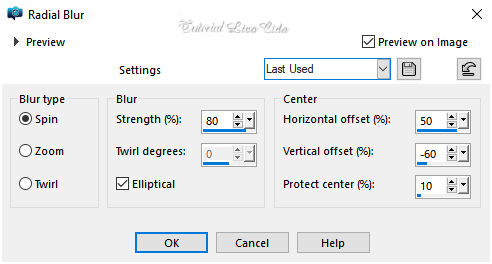
3-Adjust \ Blur\ Radial Blur .
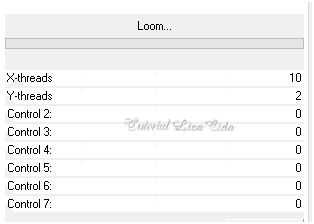
 4-Plugin FunHouse \
Loom...Default.
 5-Nova layer.
Usar a color do
foreground #d0cdcc.
Plugin AbstractCurves\
AbstractCurves...
*Lines&Stripes(19)
_Vertical lines.
( efeito no anexo
).
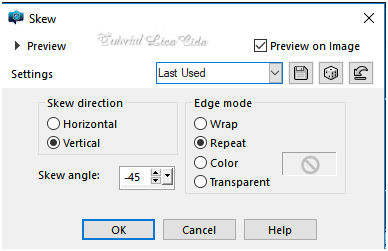
 6- Effects\ Geometric
Effects\ Skew.
 7- Effects\ Distortion
Effects\ Wrap.
 8-Effects\ Distortion Effects\
Pinch. S=100%. 9-Effects \Reflection Effects \ Rotating Mirror .
H = 0 \ R= 180 \ Repeat.
* Plugin \ MuRa's
Seamless \ Emboss at Alpha...
_Default.
Layer Duplicate\ Image Mirror
Vertical.
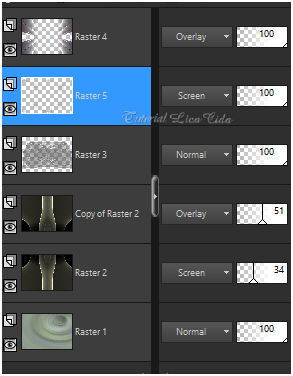
As layers raster2 e sua cópia
( copy of raster2 ) devem ficar assim.
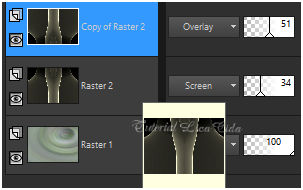 10-Nova Layer. ( estou na copy of raster2
).
Preencher
color=#000000.
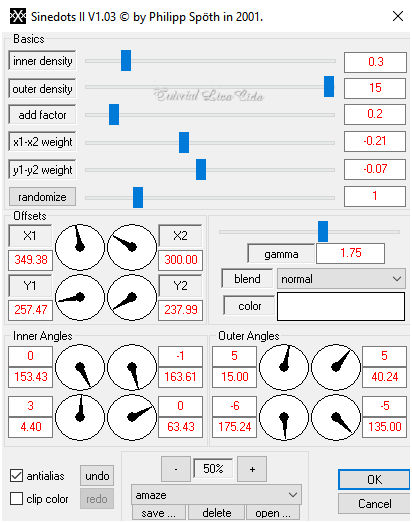
Efeitos "amaze" Plugins
DragonFlay \Sinedots II.
( efeito no anexo )
 *Plugin Transparence
\Eliminate Black.
Effects\3D Effects\ Drop
Shadow. 1\ 1\ 80\ 2,00 . (Color=#000000) .
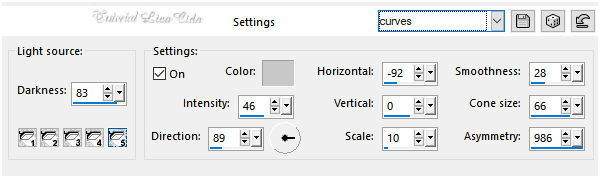
11-Effects\ Illumination
Effects\ Preset Illumination\ Lights\ curves
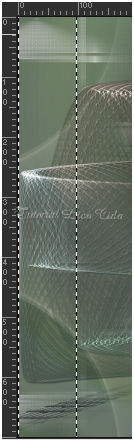
 12- View\ Rulers (
ativar a régua) . Selecionar com a ferramenta Selection Tool (S) como
modelo.
100 a 120 pxls.
 Nova layer
.
Preencher com a gradiente
formada no ítem 1 mudando Angle
90.
 Selections\ Select none.
13-Plugin Toadies\ Weaver _Default (
59-48-222 ).
14-Effects\ Geometric
Effects\ Skew.
( mudando para Transparent
)
 Layer Duplicate\ Image Mirror
Horizontal.
Layer\ Merge Down
Effects\ Edge Effects\ Enhance More.
Layer Duplicate\ Image Mirror Vertical.
Layer\ Merge Down.
15-Effects\ Distortion Effects\
Pinch. S=100%. 16-Edit Copy no decolc1 \ Paste As New
Layer. BM=Screen.
Layer\ Arrange\ Move Down.
layers\ blends\
opacitys
( use a gosto
)
 17-Ativar a
Raster1.
Edit Copy
no deco
-perspectivelc \ Paste As New Layer.
Objects\ Align\
Bottom.
18-Escolha um
misted para usar sobre esse chão \
anna.br_paisagem-by-rhigel.1_31-07-10 / aplique a Mask_herbe.
 Layer\ Merge\ Merge
Group.
Copiar o chão retirado da
mask \Paste As New Layer.
Posicione a gosto. Aplique
sobre a layer superior\ Raster4.
19-Edit Copy
no anna.br_transparent-flower_26-11-10\
( raster1 ) Paste As New Layer.
Posicione.
20-Edit Copy no
tube3228_mulher_mara_pontes\ Paste As New Layer.
Posicione.
21- Usar acima
da Copy of Raster2.
Copy Paysage misted
jewel 028\ Paste As New Layer.
Image\ Mirror Horizontal. Objects\ Align\ Right.
Layer Merge All.
22-Plugin AAA Frames\ Foto
Frame_Width-10 \ Matte-1 \ demais valores
default.
**Plugin
AAA Filters\ Custom_Sharp (
Default).
(
Opcional)
Aplicar a Marca D'agua.
Assine e
salve. Aparecida \ licacida , julho de 2018.
Espero que gostem.
Obrigada!
 |