
|
|
|
"Intuition"
Script: circulo1_mp
( Guardar em sua pasta de Scripts Restricted
)
(caso não rode seu
script, segue anexado)
Texture: Corel
15_005 .
Preset
Illumination\Lights_intuition \ mp ( Guardar em sua pasta
de Presets My PSP Files). Masks:
mask_zz\maske201_sigrid. Tube:2689 - woman - LB TUBES\
lunapaisagem6329
Brushes:bird_brushes_II_by_lpdragonfly_3
Deco:
decolc1
(Agradeço)
Marca
D'água . Efeitos do PSP.
Versão usada PSPX8.
Plugins
Plugin
MuRa's Meister,
Plugin
Nick Software\ Color EfexPro 3.0.
Tutorial _Roteiro
Configurar:
Foreground
 #05090c
\ Background #05090c
\ Background  #7b8eb8 #7b8eb81-Abrir uma nova imagem
transparente de 1024 x 800 pxls. Preencher com
o gradiente formado pelas
cores acima.
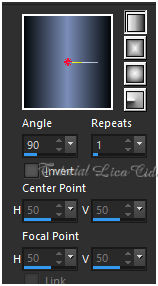
Configurar Linear, Angle 90 e Repeats 1. Invert
desmarcado.
 2-
Nova layer.
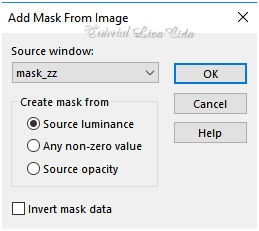
Preencher color =#7b8eb8_background. Aplicar a mask_zz.
 Layer\
Merge\ Group.
Adjust\ Sharpness\ Sharpen
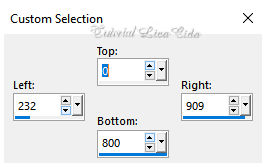
More. 3-Seleção Personalizada ( Tecle S).
 Nova Layer.
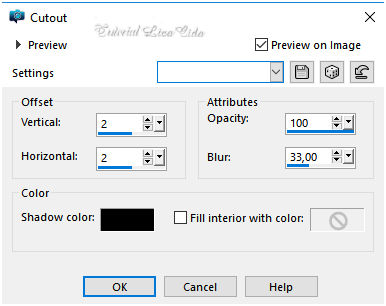
Effects\ 3D Effects\ Cutout.

 4-Nova Layer.
Edit Copy no
tube lunapaisagem6329 \ Edit Paste Into Selection .
Selections\ Select none.
Adjust\ Sharpness\ Sharpen More.
*Plugin AAA Filters\ Custom_Landscape \Default (
Opcional ).
5-Edit Copy no bird_brushes_II_by_lpdragonfly_3\ Paste
As New Layer. Posicione.
( eles vão estar integrados na
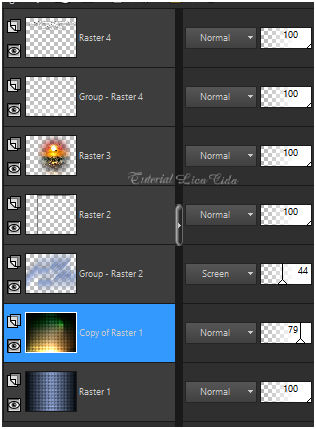
paisagem) Layer\ Merge\ Down. 6- Nova layer.
Preencher color =#ffffff. Aplicar a maske201_sigrid.
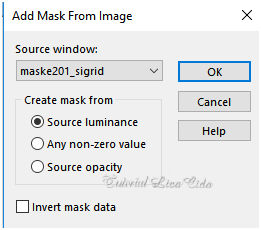 Layer\ Merge\ Group.
7-Effects\ Image Effects\ Seamless Tiling: Side by
side.
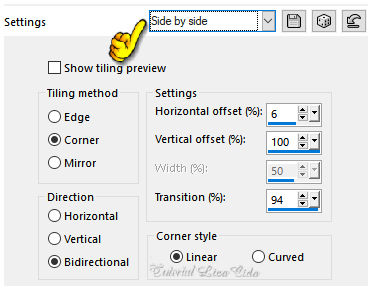 _Usando a borracha ( Eraser) , Size200, apagar o
efeito superior da mask , deixando como modelo.
 Adjust\ Sharpness\ Sharpen
More. 8- Nova Layer
( raster4).
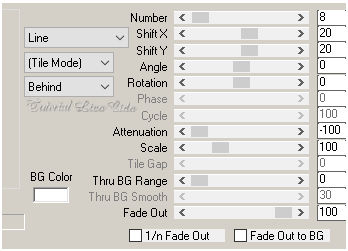
_Correr o
Script circulo1.
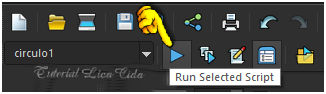 *Procurar o
script circulo1.
* Clique para
corrê-lo em Run Selected Script .
(caso não rode seu script, segue anexado)
Layer Duplicate .
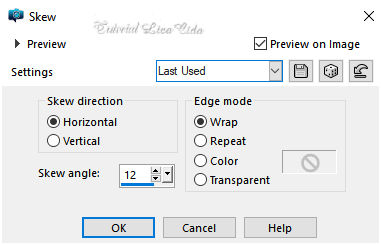
9-Effects\ Geometric Effects\ Skew.
 10-
Plugin MuRa's Meister
\Copies.
  Layer\ Merge\ Down.
Effects\3D Effects\ Drop Shadow. 3\
3\ 85\ 3,00 . (Color=#000000). 11- Ativar a raster1 .
Efects\ Texture Effects\ Texture.
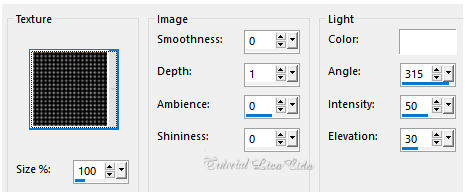 Layer Duplicate .
12-Plugin Nick Software\ Color EfexPro 3.0\
Bi -Color Filters. 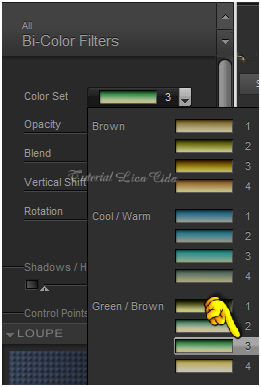 13-Effects\ Illumination Effects\ Preset
Illumination\ Lights\ intuition.
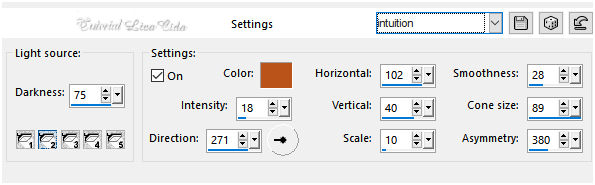 Layers\ Blends\ Opacitys.
 14-Ativar a layer
superior _raster4.
Edit Copy no 2689 -
woman - LB TUBES\ Paste As New Layer. Posicione.
*Opcional o decolc1.
Image \ Add
Borders \ 4 pxls color =#foreground
#05090c Aplicar a Marca D'agua.
Assine e
salve.
Aparecida \ licacida , abril de 2018.
Espero que gostem.
Obrigada!   |