|
|
|
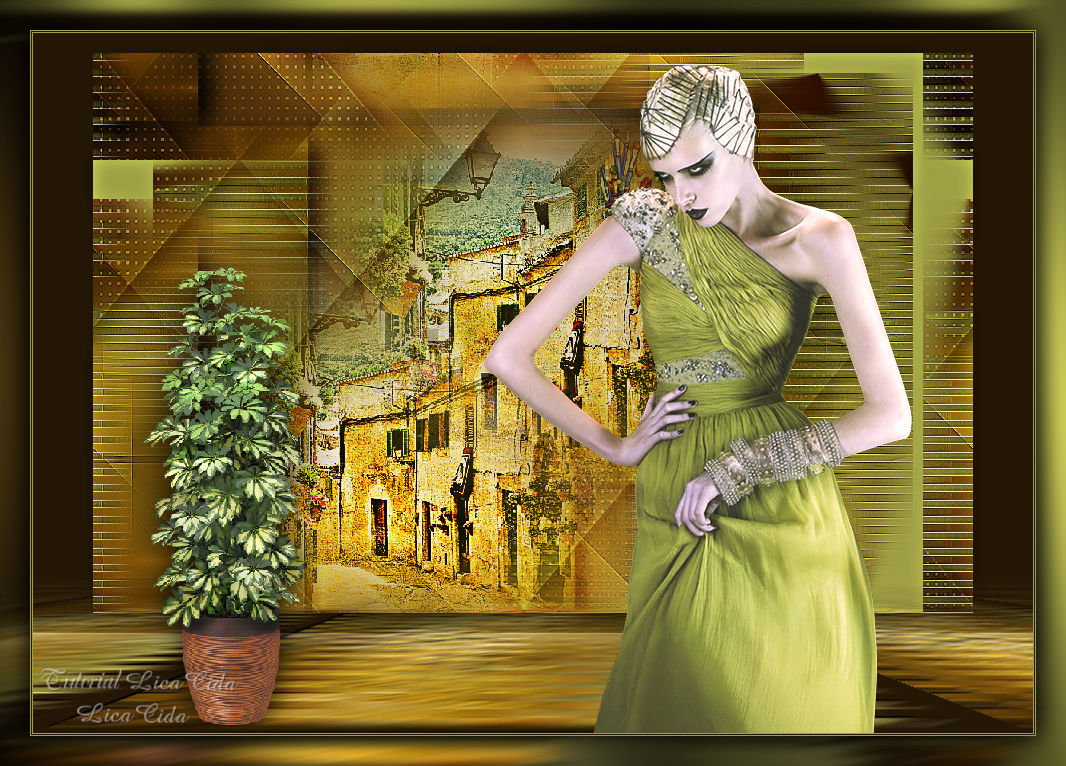
"Villarejo"
Tubes: Beauty_esperance_CibiBijoux
\Grisi_Tube_Decoration_369\ruelle_tubed_by_thafs.
Deco:
Ildiko_create_deco (139).
(Agradeço)
Marca
D'água . Efeitos do PSP.
Versão usada PSPX8.
Plugins Plugin
Mehdi
Plugin dsb
flux
Plugin Nick Software\ Color EfexPro
3.0
Tutorial _Roteiro
Configurar : #241706 _foreground
\ #9e9e44 _background.
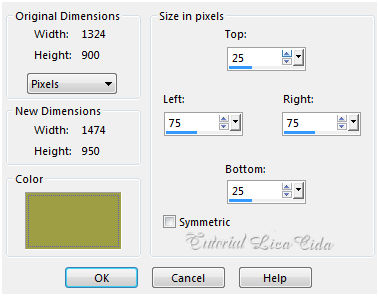
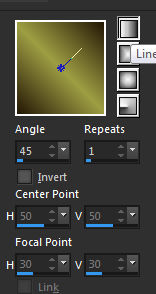
1-Abrir nova imagem transparente de 950 x 650.
Preencher com o gradiente formado
pelas cores selecionadas acima. Configurar: Linear \ Angle =45 e
Repeats =1.Invert desmarcado.
 Plugin Mehdi \ Sorting Tiles...
BR=150-300 \ B=250.
Crossed.
Effects\ Edge Effects\ Enhance
More.
2- Layer Duplicate. Image Resize
80%. Image Mirror
Horizontal.
Plugin Mehdi \ Weaver. SR=50-150 \
S=150.
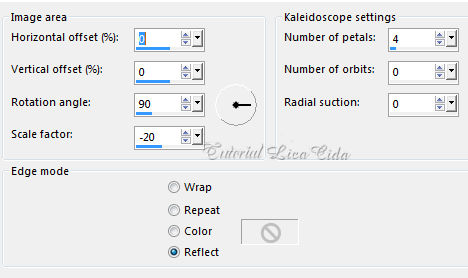
Effects\ Reflections Effects\
Kaleidoscope.
 Plugin Alien Skin Eye Candy 5 : Impact\
Perspective
Shadow_Blurry.
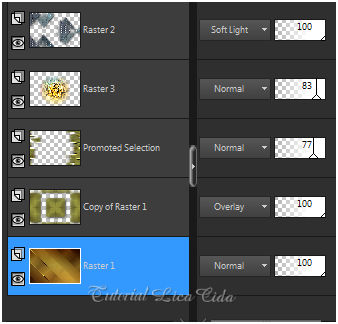
Com a ferramenta Selection Tool (s)
selecionar o efeito formado como mostra o print. 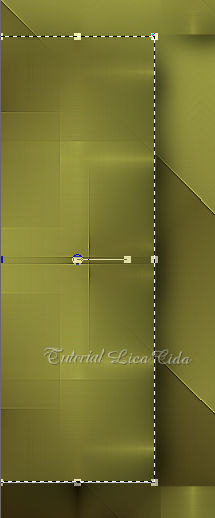 3- Promote Selection to Layer.
Selections\ Select
none.
Adjust \ Blur\ Motion Blur.
A=260,00 \
S=100%.
Plugin dsb flux \ Linear
Transmission...
 Effects\ Edge Effects\ Enhance
More.
Effects \Reflection
Effects \ Rotating Mirror . H = 0 \ R=
180 \ Repeat.
Effects\ Image Effects\ Seamless
Tiling:
 Adjust\ Sharpness\ Sharpen
More.
4- Nova Layer
.
Select All. Edit Copy no
Ildiko_create_deco (139)\ Edit Paste Into Selection .
Selections\ Select
none.
Com a ajuda da ferramenta Pick Tool
(k), acerte a lateral esquerda do back.
Plugin Alien Skin Eye Candy 5 : Impact\
Perspective Shadow_Blurry.
5-Ativar a layer Promoted Selection
.
Edit Copy no
ruelle_tubed_by_thafs\ Paste As New Layer. Resize
80%.
Adjust\ Sharpness\ Sharpen
More.
Plugin Nick Software\ Color EfexPro
3.0\ Bi-Color Filters\ Color Set \ Cool
/Warm1.
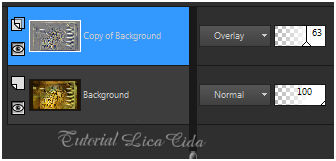
*Plugin AAA Filters\ Custom_Landscape . (opcional) 6- Aplicar na Raster1. Plugin Nick Software\ Color EfexPro 3.0\ Bi-Color Filters\ Color Set \ Violet /Pink2. Layers\ Blends\ Opacitys
7-Image add borderes ( Color background )
Effects\ Image Effects\ Seamless
Tiling: ( veja print acima
).
8-Image add borderes (Color usada no foreground ).
9- Layer Duplicate. Effects\ Edge
Effects\ High
Pass.
 Layers\ Merge\
Visible
10- Image Resize Width 1000
pxls. Ficará com o back de 1000 x 600
pxls.
 Observe Resize all layers
desmarcado.
11-Edit
Copy na imagem formada\ Paste As New Image. Vamos trabalhar
nessa nova
imagem
( Minimizamos nosso trabalho anterior para depois deletar
).
Layer Duplicate .
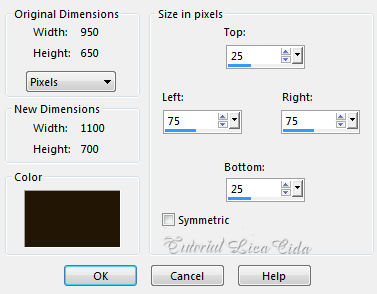
12-Image Canvas Size 1000 x 700 .
Bottom
100.
Adjust \ Blur\ Motion Blur.
A=260,00 \ S=100%.( aplicar duas vezes
)
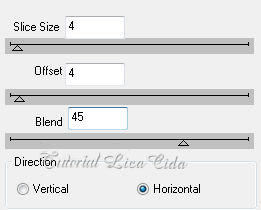
Plugin dsb flux \ Linear
Transmission...( print ítem
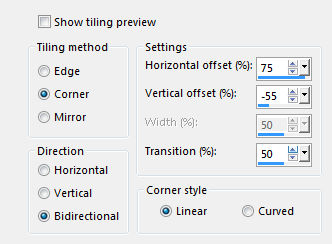
3) Plugin MuRa's Meister \Perspective
Tiling. Height 22 \ outros
valores_Default.
*Com a
Ferramenta Magic Wand \ Feather 70 \ Clique na parte
transparente .
Deletar
( cinco \ seis vezes até ficar como modelo ( o
tutorial) ). Selections \ Select none.
Emboss3. 13-
Edit
Copy no tube Beauty_esperance_CibiBijoux\ Paste As New Layer.
Posicione a
gosto.
10-Edit
Copy nos tube Grisi_Tube_Decoration_369\ Paste As New
Layer.
Posicione a
gosto.
14-Image add borderes 1
pxls \ color=
clara
Image add borderes 1
pxls \ color=
escura
Image add borderes 1
pxls \ color=
clara
Edit
Copy
Image add
borderes 30
pxls \ color=#ffffff.
Selecione
Edit
Paste Into Selection . Adjust \ Blur\ Motion Blur. A=260,00 \
S=100% ( aplicar duas
vezes).
Plugin
Graphics Plus\Cross
Shadow_Default.
INVERT
Effects\3D Effects\ Drop
Shadow. 0\ 0\ 80 \ 40,00 . (Color=#000000)
Selections\ Select
none.
Aplicar a Marca D'agua.
Assine e
salve. Aparecida \ licacida , agosto de
2017.
Espero que gostem.
Obrigada!! 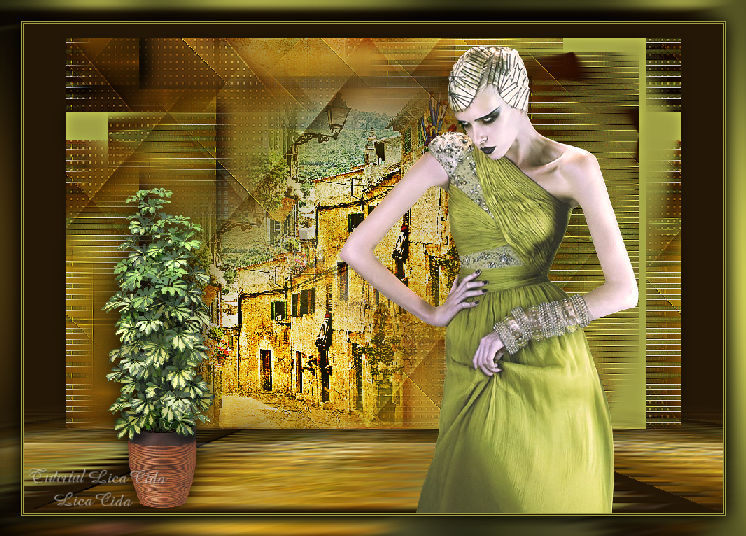  |