|
|
|
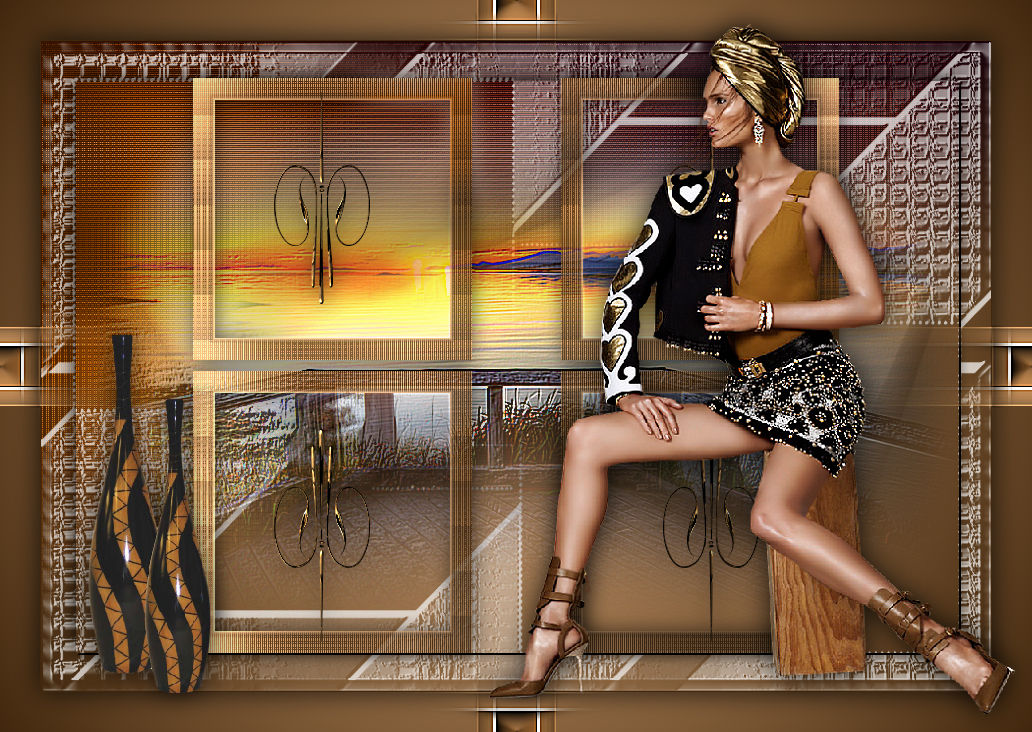
" Sovereign "
Preset
Illumination\Lights_2bllc ( Guardar em sua pasta de Presets My
PSP Files).
Tubes:Tocha24017 \
tube calguismist01082012 \tube
aclis_vases_01_10_07_2012.
Mask:
sg_glass-texture-frame.
Deco_B - 043
(Agradeço)
Marca
D'água . Efeitos do PSP.
Versão usada PSPX8.
Plugins
FFG\ M
Plugin
Galaxy
Plugin
Nick Software\ Color EfexPro 3.0
Plugin
DC Layer
Tutorial _Roteiro
#41270d \ #e5b07d\#ffffff
 Configurar
foreground=#41270d \
background=#e5b07d
1- Abrir nova imagem transparente de 950 x
650.
Preencher com o gradiente formado pelas
cores escolhidas acima retirados do misted.
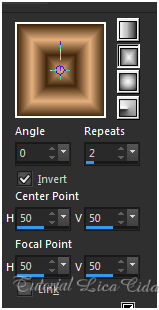
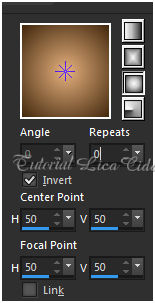
Configurar Rectangular : Angle
0 e Repeats 2. Invert marcado. CP=H e V 50 \ FP=H e
V50.
 FFG\ M
 2- Nova Layer\ Preencher
color=#ffffff.
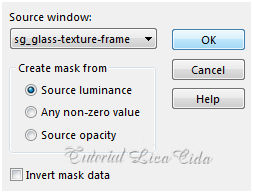
Aplicar a sg_glass-texture-frame.
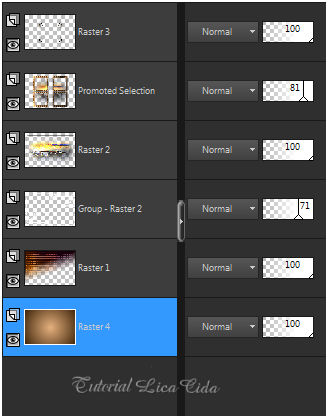
 Emboss3 . Layer\ Merge\ Group.
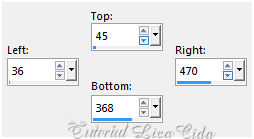
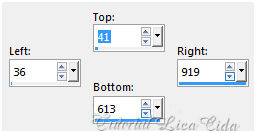
3- Seleção Personalizada ( tecle S
).
 Ativar a Raster1. Promote Selection to
Layer.
Effects\ Texture Effects\
Blinds.Color=#000000.
 Selections\ Select none.
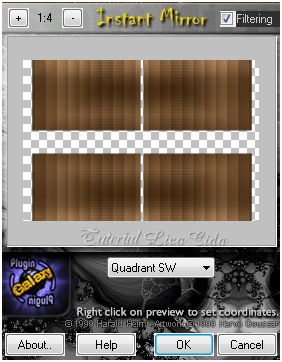
Plugin
Galaxy
 Layer\
Arrange\ Bring to Top.
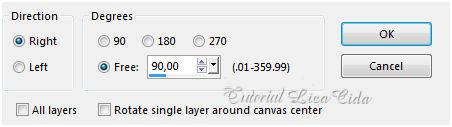
Image\
Free Rotate
 Selections\ Select All. Selections \Modify
Contract = 152 pxls .
Invert \ Delete . Selections\ Select
none.
Com a ferramenta Magic Wand _ Default, selecione a
parte externa do efeito. Invert.
Selections \Modify Contract = 22 pxls
.Delete.
Nova
Layer.
Edit
Copy no tube calguismist01082012 \ Edit Paste Into Selection .
Adjust\ Sharpness\ Sharpen
More.
Effects\ 3D Effects\
Chisel.
Color=background
 Layer\ Merge Down.
Selections\ Select none.
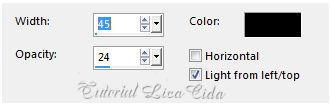
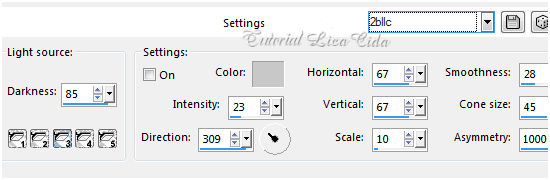
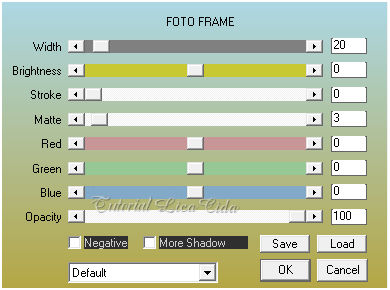
Effects \ 3D Effects \ Drop Shadow 1 \1 \ 75 \ 30,00. Color=000000. Effects\ Illumination Effects\ Preset Illumination\
Lights\ 2bllc.
 4- Seleção Personalizada 2 ( tecle S
).  Nova
Layer.
Edit
Copy no tube calguismist01082012 \ Edit Paste Into Selection (
deve estar na memória) .
Adjust\ Sharpness\ Sharpen
More.
Effects \ 3D Effects \ Drop Shadow 1 \1 \ 75 \
30,00. Color=000000.
Repetir:Effects\ Illumination Effects\ Preset
Illumination\ Lights\ 2blc.
Layer\ Arrange\
Move Down. Selections\ Select
none.
Emboss6 5-Edit Copy no deco B -
043 \Paste As New Layer.
Efects\
Image Effects\ Offset... H= (menos) -194 \V=
155 . Custom e
Transp.
Layer\
Arrange\ bring To
Top.
Effects\
3D Effects\ Inner
Bevel.
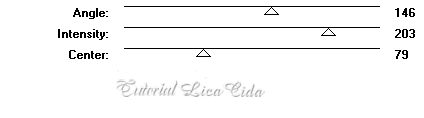
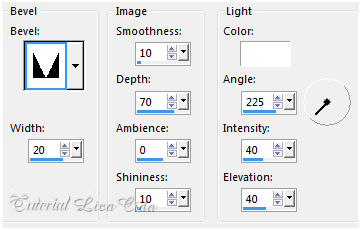 Plugin
Galaxy ( repetir valores iguais ao usado anteriormente )
Effects \ 3D Effects \ Drop Shadow 1 \1 \
75 \ 30,00. Color=000000.
Repetir:Effects\ Illumination Effects\ Preset
Illumination\ Lights\ 2blc.
6-Ativar a cor do seu foreground e procurar um tom
bem mais claro ( usei: #f9ecdf ).
Use a
ferramenta Change To Target.
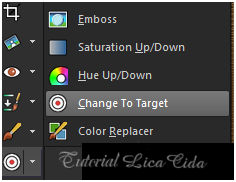 Configurar:
 Pincele
na Raster1 \ outras layers opcional .
Ainda na Raster1...Plugin Nick
Software\ Color EfexPro 3.0\ Bi-Color User Defined.
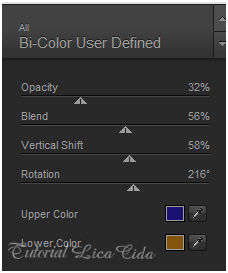 Em seguida Plugin DC Layer \
SideMerge.
 7- Nova
layer\Send to Bottom.
Preencher com
o gradiente formado pelas cores acima.
Configurar Sunburst : Repeats 0.
Invert marcado. CP= H e V= 50 \ FP= H e V=50.
 Layers\
Blends\Opacitys.
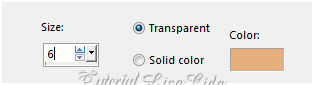
 8- Image add border 1 pxl
cor #foreground.
Image add border 40 pxls cor
#ffffff.
Selecione.
Preencha com o gradiente
formado.
9- Promote Selection to
Layer.
Invert. Effects \ 3D
Effects \ Drop Shadow 1 \1 \ 75 \
30,00. Color=000000.
Adjust\One Step Photo
Fix.
Plugin AAA\
Frames
 Effects\ Image
Effects\ Seamless Tiling:
Default. Adjust\ Sharpness\ Sharpen
More.
10-Edit Copy no tube Tocha24017 \Paste As New
Layer.Posicione \ Resize a gosto.
11-Edit Copy no tube aclis_vases_01_10_07_2012\
Paste As New Layer. Posicione
. Aplicar a Marca D'agua.
Assine e
salve. Aparecida \ licacida , junho de 2017.
Espero que gostem.
Obrigada!   |