|
|
|
"Flower Garden" Tubes:3347-luzcristina\4422-luzcristina
Deco: riss -arquivo net \R11 - Garden Design
2011 - Flower - 071
Back:backlc1
Marca D'água
. Efeitos do
PSP.
Versão
usada PSPX8.
Plugins
Plugin
Mehdi
MuRa's
Meister\ Copies\Perspective Tiling. Plugin Nik
Software
Tutorial
_Roteiro 1-Abrir uma nova imagem
transparente de 1000 x 700 pxls.
_ Select All. Edit Copy no backlc1
anexado \ Edit Paste Into Selection . Selections\ Select
none.
_Layer
Duplicate.
*(Tirar a visibilidade da layer
raster1, trabalhará melhor ).
2-
Effects\ Geometric Effects\ Perspective-Horizontal. D=97\
Transp.
_Image
Mirror Horizontal \ Repetir o efeito.
_Effects\ Distortion Effects\ Pinch.
S=100. 3-Effects\ Distortion Effects\ Wave. 0\100\ 6\ 100.
Repeat.
_Layer
Duplicate. Image Mirror Vertical.
*Ativar a layer original_Copy of
raster1.
4-Effects\ Image Effects\ Offset.H= 0 \
V= 88. (C e T).
*Ativar a layer duplicada_Copy (2) of raster1.
_Layer\Merge\Merge Down.
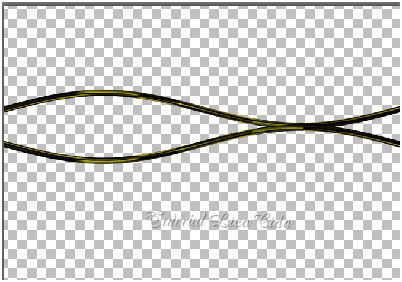 5-Image\ Canvas Size 1000 x 800. Bottom 100. 6-Plugin MuRa's Meister \ Copies. Cards
_Ativar a
régua e usar a ferramenta pick para acertar o efeito. Arrastar para a
esquerda e depois trazer a 520 pxls.
_Effects \Reflection Effects \ Rotating
Mirror . H = 0 \ R= 180 \ Repeat.
7- Nova
Layer. Send to bottom.
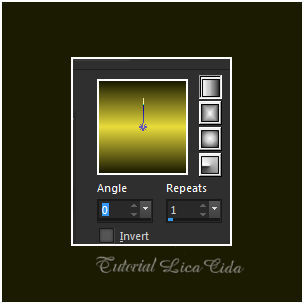
_Preencher
com o gradiente formado pelas cores #1b1b02 e #e8db3c.
Configurar Linear : Angle 0 \ Repeats 1.
Invert desmarcado.
*Abrir a
visibilidade e ativar a Raster1.
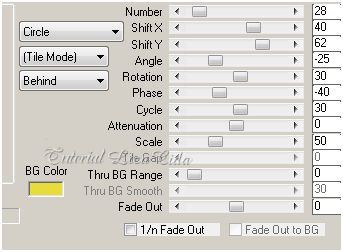
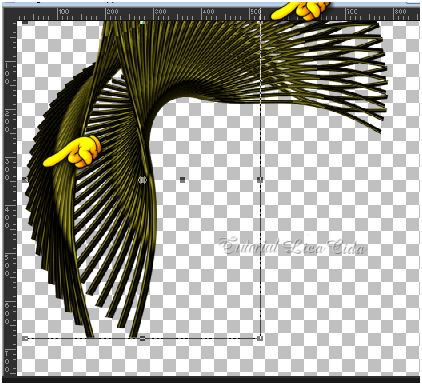
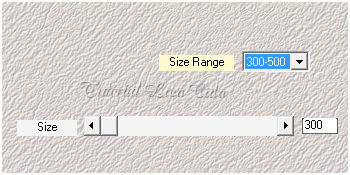
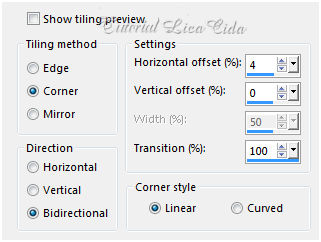
8-Plugin MuRa's Meister \ Perspective Tiling:

*Com a Ferramenta Magic Wand \ Feather 70 \ Clique na parte transparente . Deletar ( cinco \ seis vezes_ suavizar bem o efeito ). Selections \ Select none. _Emboss3. Layer Duplicate. 9-Effects\ Geometric Effects\ Skew. Vertical\ ( menos) -45\ Transp. _Effects \Reflection Effects \ Rotating Mirror . H = 0 \ R= 180 \ Repeat. 10-Plugin Mehdi \ Weaver.
_Layer Duplicate. Image Mirror Vertical. Layer\ Merge Down. _Effects\ Edge Effects\ Enhance More. 11- Ativar a layer superior Copy of Raster1 e aplicar: _ Effects\ Distortion Effects\ Pixelate.
_Effects\ Edge Effects\ Enhance More. 12- Ativar a layer inferior _Raster 2 e repetindo aplicar: _ Effects\ Distortion Effects\ Pixelate.
_Effects\ Edge Effects\ Enhance More. 13-Retorno a layer superior_ Copy of Raster1 e aplicar: _Effects\ Distortion Effects\ Pinch.
S=100. _Layer Duplicate. Resize
70%.
14-Effect\ Image Effects\
Seamless Tiling...
 _Com a borracha size 100,
apague os efeitos abaixo, observe o tutorial.
_Layer\ Merge\ Merge
Down.
15-Retorno a layer
inferior _Raster 2 .
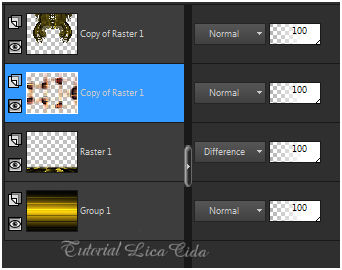
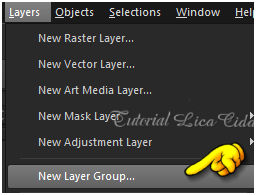 _Foi criado o group1
. Ativo a Raster2.
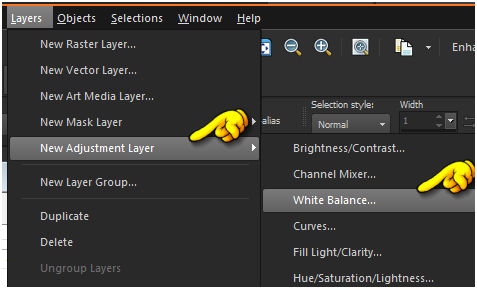 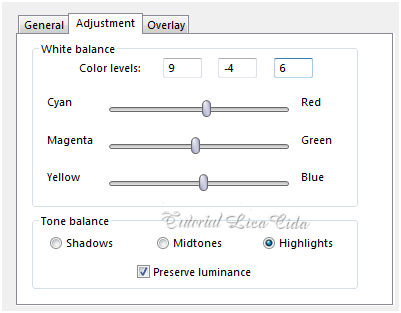 _Na White balance formada
mude o blende mode a gosto. Usei o multiply.
_Layer\ Merge\ Merge
Group.
18- Na layer
superior, raster1 e na inferior.
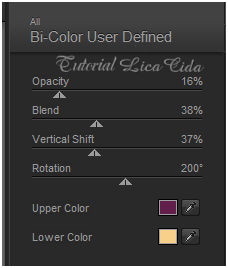 _ Aplicar o Plugin Nik
Software \Color EfexPro 3.0 \ Bi-Color User Defined.
Cores=#631f4b e
#f8d08a.
_Na layer do efeito
Mehdi \ Weaver, aplicar o Plugin Nik Software \Color EfexPro
3.0 \ Bi-Color Filters .Color Set \ Violet\Pinck3. ( aplicar duas
vezes)
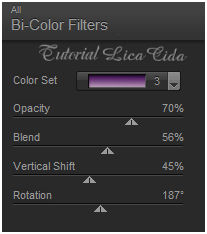 (Color Set\ usar a
gosto)
Layer\ Blends\
Opacitys.
 19-Edit Copy
no 3347-luzcristina \ Paste As New Layer .
Posicione.
_Adjust\ Sharpness\
Sharpen.
20-Edit Copy
no riss -arquivo net \ Paste As New Layer.
Emboss3.
21-Edit Copy no
R11 - Garden Design 2011 - Flower - 071 \ Paste As New Layer. use a
gosto.
_Adjust\ Sharpness\
Sharpen.
Layer\Merge\Visible.
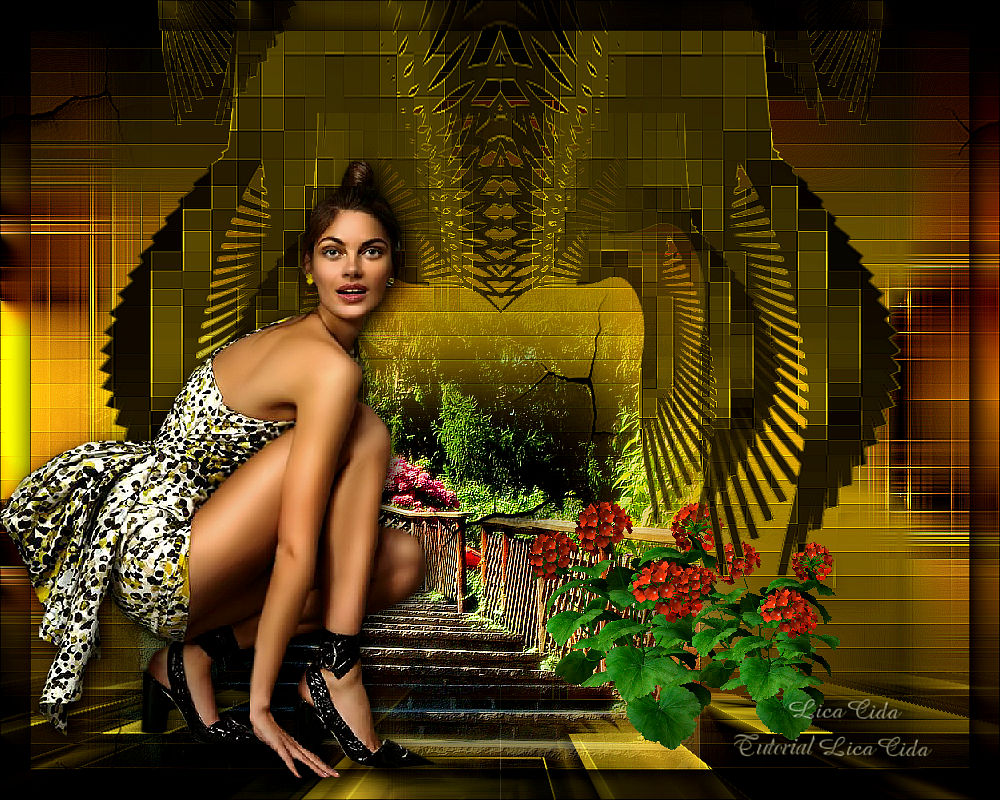
22-AAA Frame \ Foto
Frame.
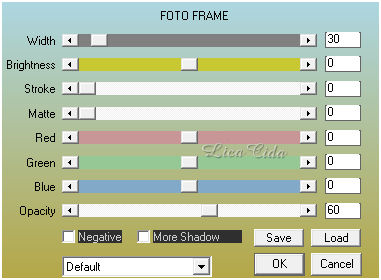 23-Sel All\ Modify\ Contract
30 pxls\ Invert.
_Plugin Graphics Plus\ Cross Shadow _Default. _Invert. _Effects\3D Effects\ Drop Shadow. 0\ 0\ 80\ 40,00 . (Color=#000000) . _Selections\ Select none. 24-Edit Copy no 4422-luzcristina \ Paste As New Layer . Posicione. _Adjust\ Sharpness\
Sharpen.
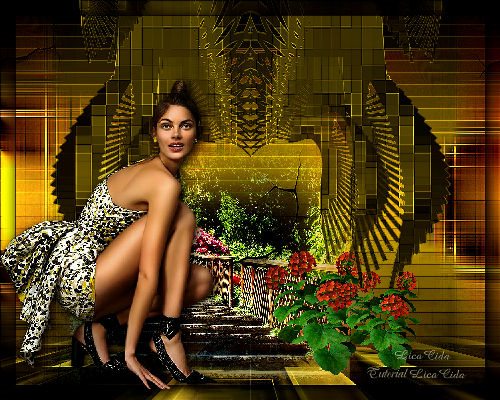
_Image add border 1 pxl Color= #000000. _Aplicar o **Plugin AAA Filters\ Custom_Landscape .
Aplicar a Marca
D'agua.
Assine e salve.
Aparecida \ licacida , outubro de
2016.
Espero que
gostem.
Obrigada!!
 |