 |
|
|
|
Versões Amigas
" Neusa Novaes" Com carinho!!
Preset
_ AirBrush \ 3d (marapontes) ( salve em sua paste de presets_
airbrush my psp files)
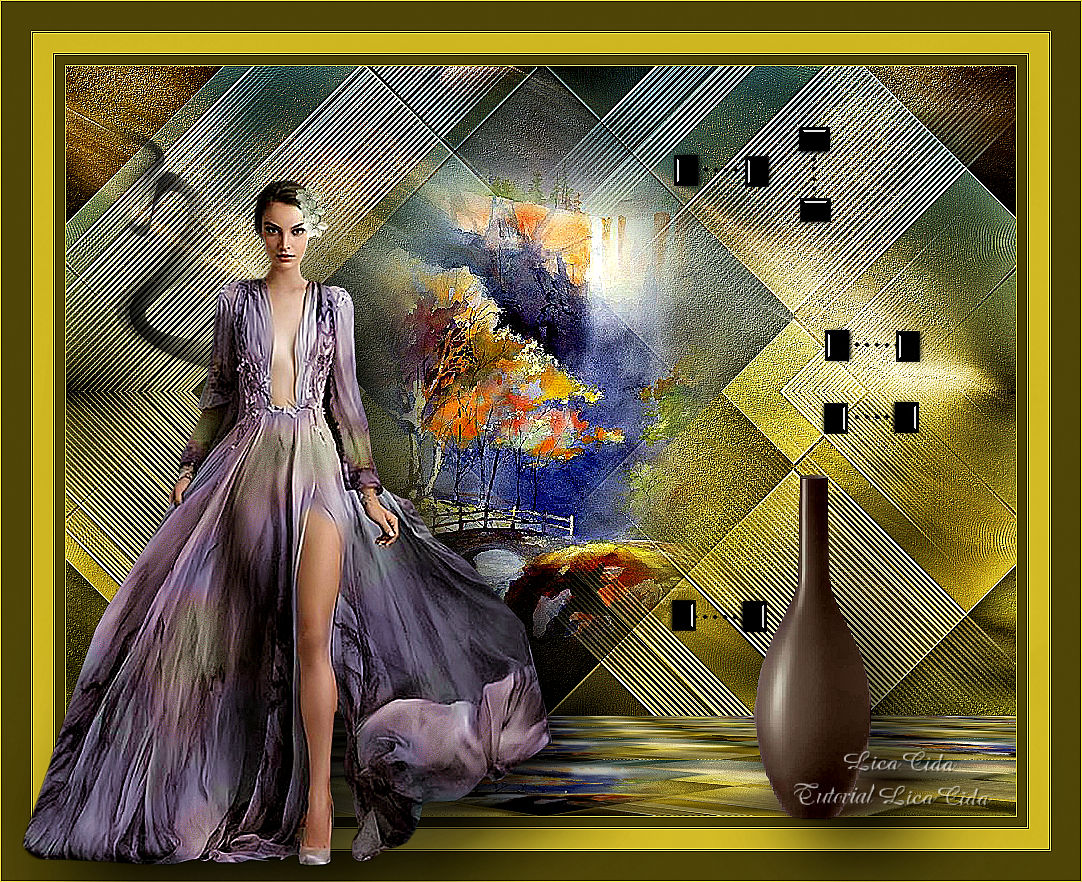
Tubes: tube nuvens-luzcristina\tube
Paysage misted jewel 025 \no tube 4360-luzcristina.
Deco:tube Athe-DEC24 ( arquivo net) \
tube deco-athe ( arquivo net ).
Brushe:designal brushes 3_12
Back:JHanna_32 bground .
Marca
D'água . Efeitos do PSP.
Versão usada PSPX8.
Plugins
Plugin
VM Instant Art .
Plugin
Mehdi.
MuRa's
Meister \Perspective Tiling.
Plugin
AAA Filters .
Plugin
Nick Software\ Color EfexPro 3.0.
Tutorial
_Roteiro 1-Abrir uma nova imagem transparente de 950
x 650 pxls. Select All. Edit Copy no
JHanna_32 bground \ Edit Paste Into
Selection. Selections\ Select
none.
_Effects\ Image Effects\ Seamless Tiling: Transition\
96.
_Adjust\ Blur\ Motion Blur. A= 298\
S= 100 .
2-Adjust\ Add/ Remove Noise \ JPEG Artifactal
Removal... ( Maximum\ C=89) .
3- Edit Copy no tube nuvens-luzcristina\
Paste As New
Layer.
_Objects\
Align\ Top.
_ Blend Mode=Overley. Layer\ Merge\ Merge
Down.
_Layer\Duplicate.
_Adjust\ Blur\ Gaussian Blur. R=
26 .
4-Plugin
VM Instant Art \Tripolis_Default.
5-Plugin
Mehdi\ Edges FX.
(Color=#000000)
onfigurar
 _Adjust\ Sharpness\ Sharpen More.
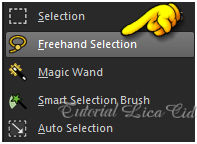
6-Ativar a
ferramenta
Configurar:
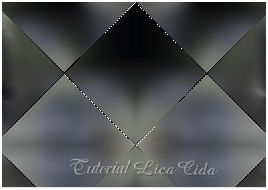
_Selecionar como mostra o print . DELETE.
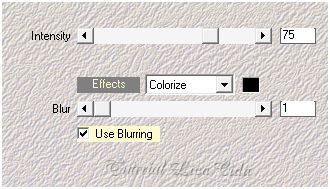
_Ativar a Raster 1. Promote Selection to Layer. _Selections\ Select none. 7-Ativar a copy of raster1. _Effects\ Image Effects\ Seamless Tiling: Transition\ 96. (repetir) 8-Ativar o AirBrush. _Foregraund color=#ffffff e Background color=TRANSPARENT. _ Procurar o Preset_Airbrush_ 3d ou configure: ( use de baixo para cima, seguindo o efeito do motion blur)
_Effects\ Edge Effects\ Enhance. 9- Plugin\ Graphics Plus\ Vertical Mirror. 128 \ 0. _Effects\3D Effects\ Drop Shadow. 0\ 0\ 80\ 40,00 . (Color=#000000) . 10-Edit Copy no tube Paysage misted jewel 025 \Paste As New Layer. _Layer\ Arrange\ Move Down. Resize 80%. _Adjust\ Sharpness\ Sharpen More. 11-Duplicar a Raster1. _Plugin Nick Software\ Color EfexPro 3.0\ Bi-Color Filters\ Color Set \ Brown1. 12-Duplicar a Copy of Raster1. _Plugin Nick Software\ Color
EfexPro 3.0\ Bi-Color Filters\ Color Set \ Cool/Warm1.
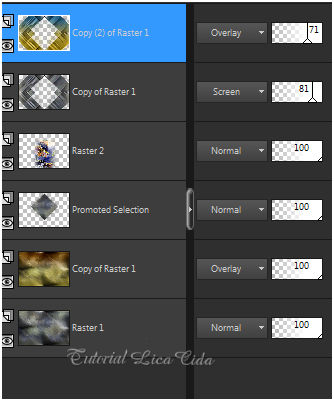
_Layers\ Blends\ Opacitys
_Layers \ Merge \ Merge All . Edit Copy no back formado. 13- Image - Canvas Size - 950 x750 pxls, bottom 100. _Selecione com a ferramenta magic wand o bottom 100 ( essa parte formada) \ Edit Paste Into Selection. 14-Plugin MuRa's Meister \ Perspective Tiling: Default. _Selections\ Select none.
15-Escolha duas cores que combine com seu trabalho: usei fore=#454019 \\ back=#b9aa3f. _Image add border 1 pxl cor back \ Image add border 10 pxls cor fore \ Image add border 1 pxl cor back. _Image add border 1 pxl cor fore \ Image add border 20pxls cor back \ Image add border 1 pxl cor fore. _Image add border 1 pxl cor back \ Image add border 30 pxls cor fore \ Image add border 1 pxl cor back.
**Plugin AAA Filters\ Custom_Landscape .
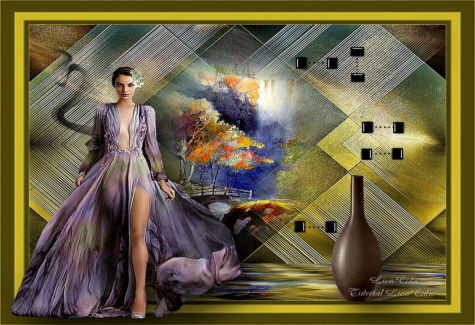
16-Edit Copy no tube 4360-luzcristina.\ Paste As New Layer.Posicione. 17-Edit Copy no tube Athe-DEC24 ( arquivo net) \ Paste As New Layer.Resize e posicionamento. 18-Edit Copy no tube deco-athe ( arquivo net ).\ Paste As New Layer.Posicione, use a gosto. 19-Edit Copy no designal brushes 3_12\Paste As New Layer.Posicione. _Layers \ Merge \ Merge All *Opcional _Plugin Nick Software\ Color EfexPro 3.0\ Tonal Contrast ( como abrir).
Aparecida \ licacida , Setembro de
2016.
Espero que gostem.
Obrigada!!
|