 Versões Amigas
Versão usada PSPX7. Poderá
ser feito em outras versões.
Tutorial
"Beautiful"
Tube: tube2142_mulher_mara_pontes
.
Masks:
Narah_mask_Tops004 \ !!!!gradientedworisch .
Arquivo: elemento1lc
Marca D'água. Efeitos do PSP.
Versão usada PSPX7.
Plugins
Plugin AAA Frames\ Foto
Frame.
Plugin Alien Skin Eye Candy 5: Impact \ Perspective
Shadow...
Plugin VM
Toolbox\ Zoom
Blur.
Tutorial
_Roteiro 1-Abrir uma nova imagem
transparente 988 x 600 pxls.
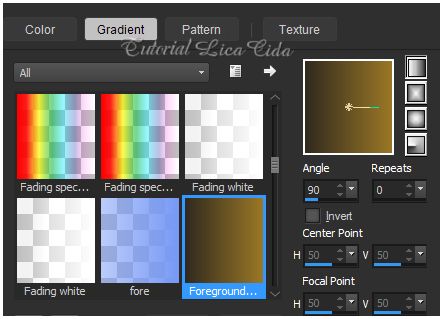
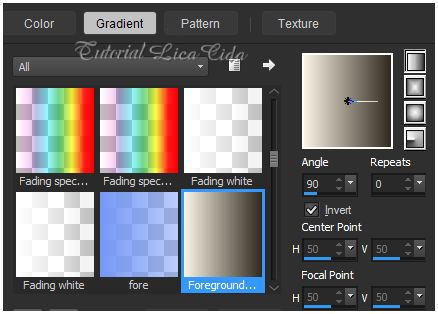
Pintar com a gradiente formada pelas
cores #312a1f
e #927124 . Configurar
Linear A=90\R=1 . Invert
desmarcado.
2-New Layer
.
Select
All. Edit Copy no tube2142_mulher_mara_pontes \ Edit Paste Into
Selection. Selections\ Select none. Resize 80%.
_Effects\ Image Effects\ Seamless Tiling:
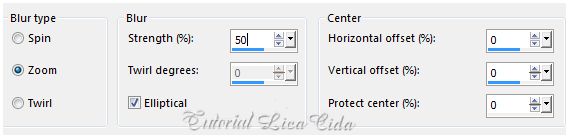
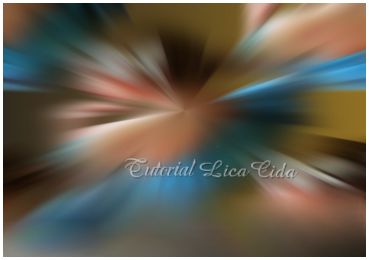
Default. 3-Adjust\ Blur\ Radial Blur...
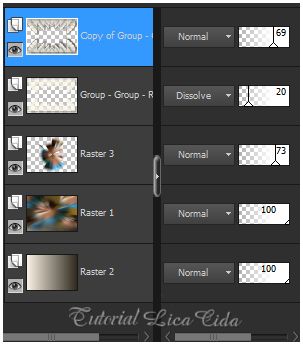
 _Layer merge Down
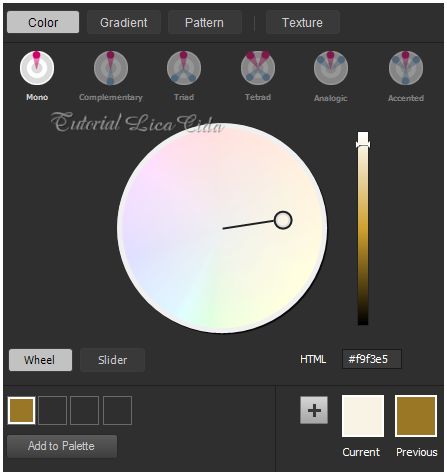
4-Aivar o Background . Procurar uma cor do
seu agrado. Usei Color= #f9f3e5.
New Layer . Preencher com a cor
escolhida.
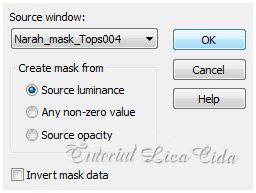
_Aplicar a Mask:
Narah_mask_Tops004.
 5-Effects \Reflection
Effects\ Feedback ...
 _Image\ Flip .
Layer \Merge \ Merge
Group.
_
Objects\ Align\ Bottom.
6-Aplicar a mask gradienteDW. Layer \Merge \ Merge
Group.
7-Image \ Canvas Size... 988 x 700.
Bottom 100.
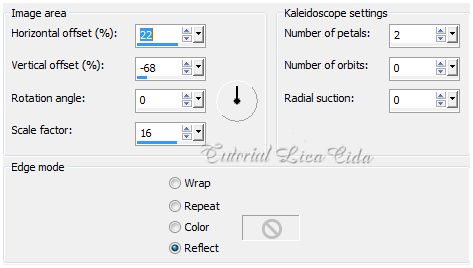
8-Effects \Reflection
Effects\ Kaleidoscope.
 9-Plugin AAA Frames\ Foto Frame.
Width 30 \demais
valores_default.
_Layer
Duplicate.
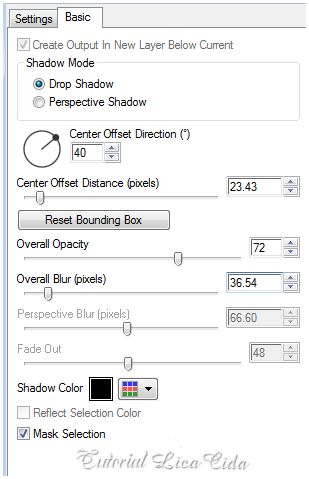
10- Plugin Alien Skin Eye Candy 5:
Impact \ Perspective
Shadow...
 11-New Layer. Arrange / Send to Botton . (Preservar a cor do Foreground e usar a cor escolhida no Background ) Pintar com a gradiente formada pelas
cores #312a1f
e #f9f3e5 . Configurar
Linear A=90\R=1 . Invert
marcado.
 12- Ativar a ferramenta Smudge.
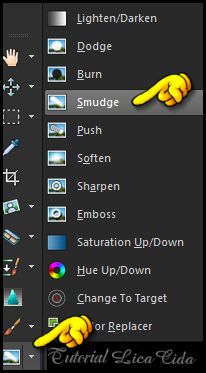 *Configurar.
 (Tirar a visibilidade das layers
superiores para vizualizar melhor)
_Suavizar a parte inferior da Raster1
.
 13- Copy
no tube2142_mulher_mara_pontes \Paste As New
Layer.
_ Resize 80%. duas vezes. Image \Mirror.
14-Plugin VM Toolbox\ Zoom Blur_ Default
(39-60).
Layers\ Blends\
Opacitys.
 15- Ativar a Layer
superior.
Copy
no tube2142_mulher_mara_pontes \Paste As New
Layer.
Resize 80%\
Image\Mirror.
(Aplicar a mask
gradienteDW. Layer \Merge \ Merge Group.
Dependendo do tube que
usar)
16-Ativar a
Raster3.
Copy
no elemento1lc \Paste As New Layer.
Opacity 73%.
_ Use Opacitys e
Blends a gosto.
Una as layers\ Merge
All.
17-Tecle a letra (
S ). Ative\ Custom
Selection. 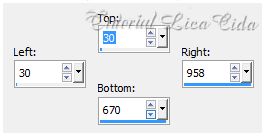 _Effects \ 3D
Effects \ Drop Shadow: 0\ 0\ 80\ 40,00. Color=#000000
.
_Selections \ Select
none.
Assine e salve.
Aplicar a marca
D´água.
Formate e decore sua tag a
gosto.
Espero que
gostem. Aparecida /
Licacida, novembro de 2014.
Rio de Janeiro_Brasil 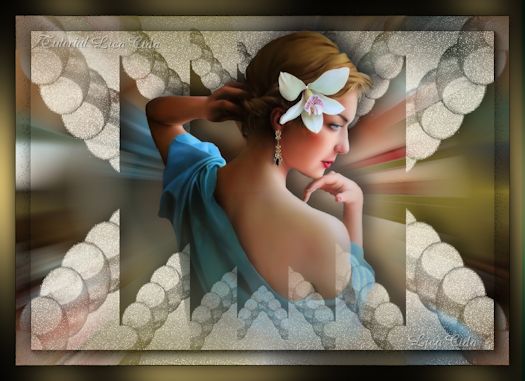  |