| |
|
VERSÕES AMIGAS
Tag
"Fantasy"
Seleção:
selfantasylc . Salve em sua pasta de seleções My PSP
Files.
Preset
Illumination\ Lights \ lightlc5.\ (guardar em sua pasta de Presets My
PSP Files).
Tube:
Gabry-fantasy 821
Back:back
fantasy
Brush:
brush h9sgh992
Tubed by
Silvie- Glowings_30 Marca
D'água. Efeitos do
PSP.
Versão usada PSPX7. podendo ser
usado em outras versões.
Plugins
Plugin Galaxy \ Warp 2. Plugin Alien SkinEye Candy5: Extrude \ Perspective Shadow.
Tutorial
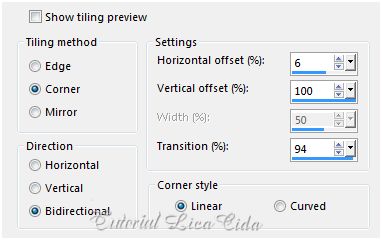
_Roteiro 1-Abrir uma nova imagem transparente 988 x 600.Pintar de Color=#000000 ( usar no background ). 2- Selections \ Select All. Edit\ Copy no back fantasy . Edit\ Paste Into Selection. Selections \ Select None. 3-Effects\ Image Effects\ Seamless Tiling.
*Image\Mirror 4-Selections \Load \ Save Selection \ Load Selection From Disk \ Load fantasylc. 5-New Layer . Preencher com o gradiente formado pelas cores #11053b e #000000. Configurar Radial: Angle 90 e Repeats 3. Invert marcado. CP=H 50\ V 40. 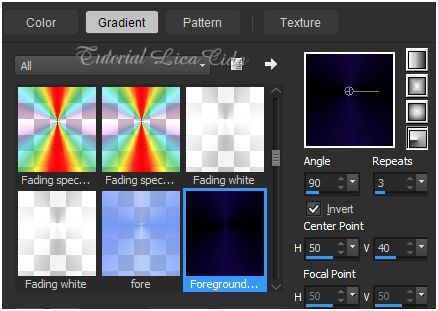 *Selections \ Select none. 6-Plugin Galaxy \ Warp 2.
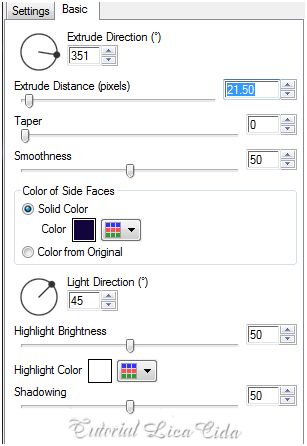
* Adjust\ Sharpness\ Sharpen More. 7-Plugin Alien SkinEye Candy5: Extrude.
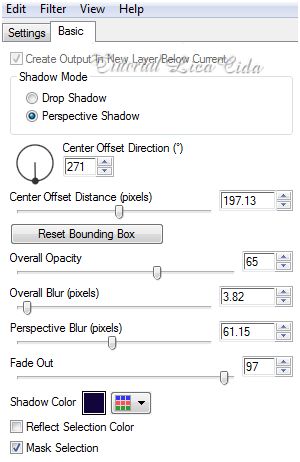
*Effects \ 3D Effects \ Drop Shadow. 0\0\80\46,00 Color=#000000 .*Repetir 8- Copy no tube Gabry-fantasy 821 .Paste As New Layer . Resize 70% .Mirror. Posicione. 9-Plugin Alien SkinEye Candy5: Perspective Shadow. *Usar a cor do Foreground.
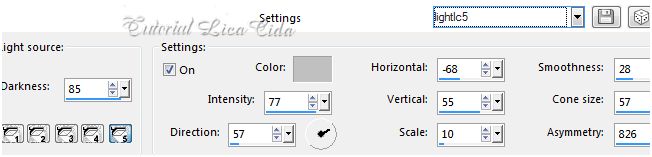
10-Effects \Illumination Effects \ Preset Illumination\Lights\ lightlc5.
* Adjust\ Sharpness\ Sharpen More. *Layer Duplicate. Blend Mode= Multiply \ Opacity50%. *Layer\ Merge\ Merge Down. 11-Ativar a Raster3. Selections\ Select all . Selections Float\Defloat. *New Layer . Edit Copy no brush h9sgh992 \ Edit Paste Into Selection . Selections \ Select none. 12- Adjust\Hue and Saturation\ Hue Map...
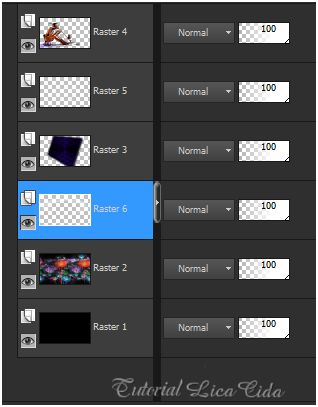
* Adjust\ Sharpness\ Sharpen More. * Opcional_Com a ferramenta Pick Tool acertar as sobras do escrito. 13-Ativar a Raster 3 e a Raster2. * Adjust\ One Step Photo Fix. 14-Na Raster2.
New Layer . Selections \ Select All. Edit\
Copy no Glowings_30 _Fairydust_ . Edit\ Paste Into
Selection.
* Selections \ Select
None.
* Layer\
Duplicate. Image Mirror.
*Layer \ Merge\
Merge Down.
Layers\ Blends\
Opacitys.
Use\modifique a
gosto.
 *Layer \ Merge \
Merge Visible.
*Image
\Resize90%.
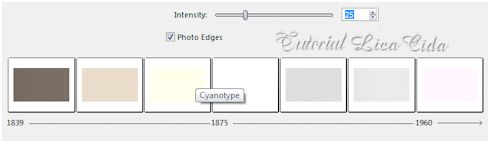
15-Effects \ 3D Effects \ Drop Shadow. 0\ 0\ 80\ 46,00. Color=#000000 . 16-New Layer. Arrange\ Send to Botton. Preencher Color=#ffffff.17-Effects\ Photo Effects\ Time Machine...
* Adjust\ One
Step Photo Fix. Aplicar duas vezes.
Aplicar a Marca
D'agua.
Assine e salve em JPG.
Espero que gostem .
Rio de Janeiro , Janeiro de
2015.
Aparecida/Licacida
Brasil.  
|

 ¨
¨