|
|
|
|
VERSÕES AMIGOS
Top "Une Femme
Amoureuse"
Dedico a querida Angela*Poesi@ ,
"ontem e sempre ...
...eu te amei..."
Preset Illumination\ Lights \ lights3bllc (guardar em sua pasta de Presets My PSP
Files)
Mask: Mask Gradiente
DW.
Tubes:AnaRidzi1731\AnaRidzi16.
Marca D'água.
Efeitos do PSP.
Versão usada
PSPX6.
Plugins
Plugin MuRa's Meister_Pole Transform \
Perspective Tiling\ Copies.
Plugin dsb flux \
Blast...
Plugin AAA Frames
\ Foto Frame.
Plugin
Tramages\Pool Shadow...
Plugin nik Color Efex Pro!1.0 \ Graduated
User Defined.
Tutorial \
Roteiro
1- Abrir uma nova imagem transparente de
1000 x700. Pintar com a gradiente formada pela escolha de
duas cores da sua imagem . (( Usei #5a4e51 no
foreground e #d0c1c1 no
background)).
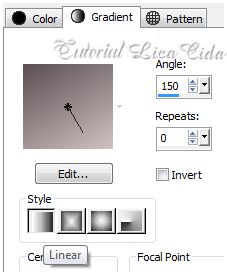
Configurar Linear : Angle
150\ Repeats 0. Invert desmarcado.
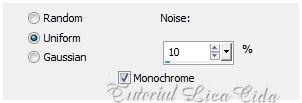
 2-Adjust\ Add \ Remove Noise \ Add
Noise.
 3-New Layer. Select all \ Edit copy no tube AnaRidzi1731\ Edit Paste Into Selection .
4- Adjust\ Blur\ Radial Blur.
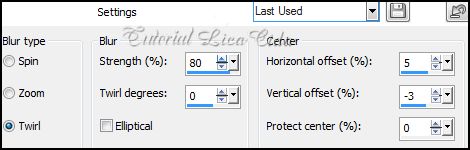
5- Ativar a Ferramenta Warp Brush \Noise _ veja configuração no print.
Aplicar misturando o efeito
(( usar a gosto)) .
 Selection/Select
None.
Emboss
3.
6- Effects\ Geometric Effects\
Perspective-Horizontal ... ( menos) -90
Repetir
: Effects\ Geometric Effects\ Perspective-Horizontal...
90.
7-Effects\
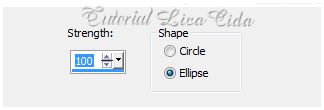
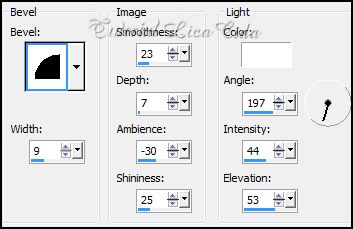
Distortion Effects\ Pinch... S=100.
8-Effects \ 3D Effects\Inner
Bevel.
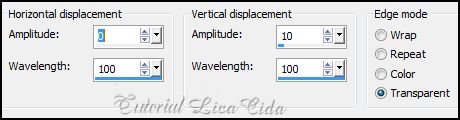
9-Effects\ Distortion Effects\Wave.
Layer Duplicate. Image Mirror.
Layer \ Merge \ Merge Down.
10-Plugin MuRa's Meister\Pole Transform.
Image Flip.
11-Plugin MuRa's Meister \ Copies : Default.
Layer Duplicate.
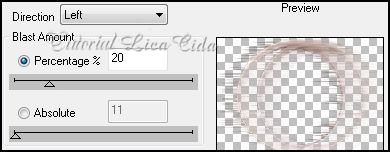
12-Plugin dsb flux \ Blast...
Layer\ Arrange\ Move Down.
Ativo a Raster 2 . Layer Duplicate.
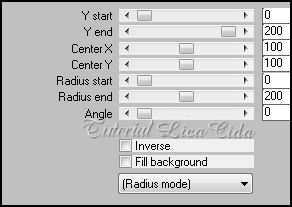
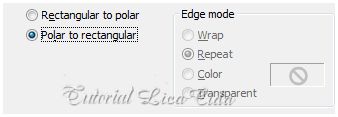
13-Effects\ Distortion Effects\ Polar Coordinates.
14-Repetir o ítem 7 _Effects\ Distortion Effects\ Pinch... S=100.
Image Flip.
15-Effects \ Image Effects \Offset... 0\ 64 Custom e Transparent marcados.
16-Volto a ativar a Raster2.
Effects\ Geometric Effects\ Spherize.
17- Ativar a Raster1. Aplicar a Mask gradientedw . Layer \Merge \ Merge Group.
18-Image \Canvas Size _1000 x 800_Bottom 100.
19- Nova Layer. Layers\
Arrange \Send to Bottom. Pintar com a
mesma gradiente formada acima,
usando o invert
marcado.
20- Plugin AAA Frames\ Foto Frame...
Default.
21-Ativar a Group-Raster1.
Plugin Tramages\Pool
Shadow...Default.
Layer Duplicate.
22-Plugin MuRa's Meister\ Perspective Tiling.
Default.
Com a ferramenta Pick descer a
670pxls.
Com a
Ferramenta Magic Wand _Default_ selecionar a parte transparente.
Selections \ Modify \ Feather 50 pxls - Deletar (três\
quatro vezes ).
Selections
\ Select none.
Layers
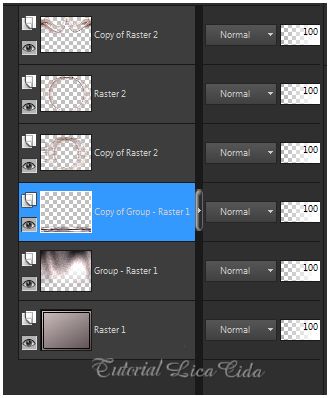
23- Aplicar a Mask gradientedw na Raster 2 e Copy of Raster 2 . Layer \Merge \ Merge Group.
24-Usar nas três primeiras layers dos efeitos: Plugin Alien Skin Eye Candy 5 : Impact\ Perspective Shadow. Drop Shadow, Blurry.
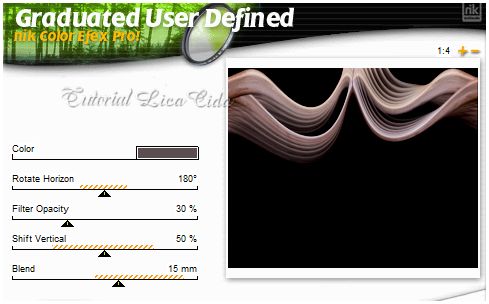
25-Intercalando a gosto, usando as cores acima, aplicar nas layers o Plugin nik Color Efex Pro!1.0 \ Graduated User Defined. Color=#5a4e51 ( cor usada no foreground
).
 26-Edit Copy no tube AnaRidzi16\ Paste As New Layer. Posicione e resize a gosto.
Aplicar:
Effects \Illumination Effects \
Preset Illumination\Lights\ lights3bllc.
27-Edit Copy no tube AnaRidzi1731 \ Paste As New Layer. Posicione e resize a
gosto.
Opcional mudar os blends e
opacitys.
Acabamentos a
gosto.
Aplicar a Marca
D'agua.
Assine e salve.
Espero que
gostem. Aparecida / licacida, Abril de
2014.
Rio de Janeiro_Brasil 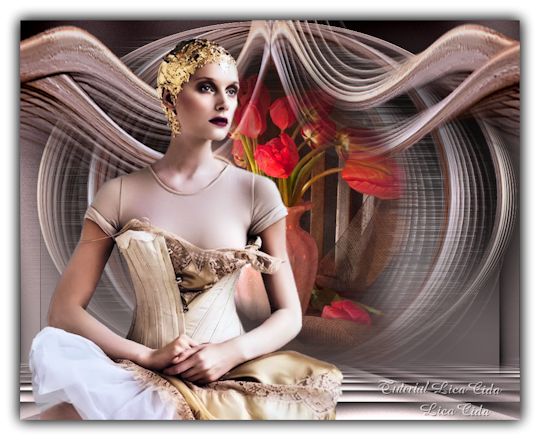 
|