 |
|
Top
Aime-moi
**Dedico com carinho a querida amiga e ex moderadora
Helena Vera.
Material Aqui
Tubes: tube1280_mulher_mara_pontes \ TubeNP 974 \tube5High Style_LR. Masks : tuile211( não sei autoria
) \ Mask !!!!.mask.ket-fadesuave.
Texture: 8SUIZA. Marca
D'água.
Efeitos do PSP.
Versão usada PSPX6.
Plugins
Plugin Alien Skin Eye Candy 5 : Impact\
Extrude.
Plugin MuRa's Meister\ Perspective
Tiling.
Plugin Flaming Pear\
Glitterato...
Plugin DC Layer\ SideMerge.
Plugin nik Color Efex Pro!1.0 \ Graduated User
Defined.
Plugin UnPlugged Effects\ Disco
Lights.
Tutorial \ Roteiro
1- Abrir a imagem transparente de 1024x600.
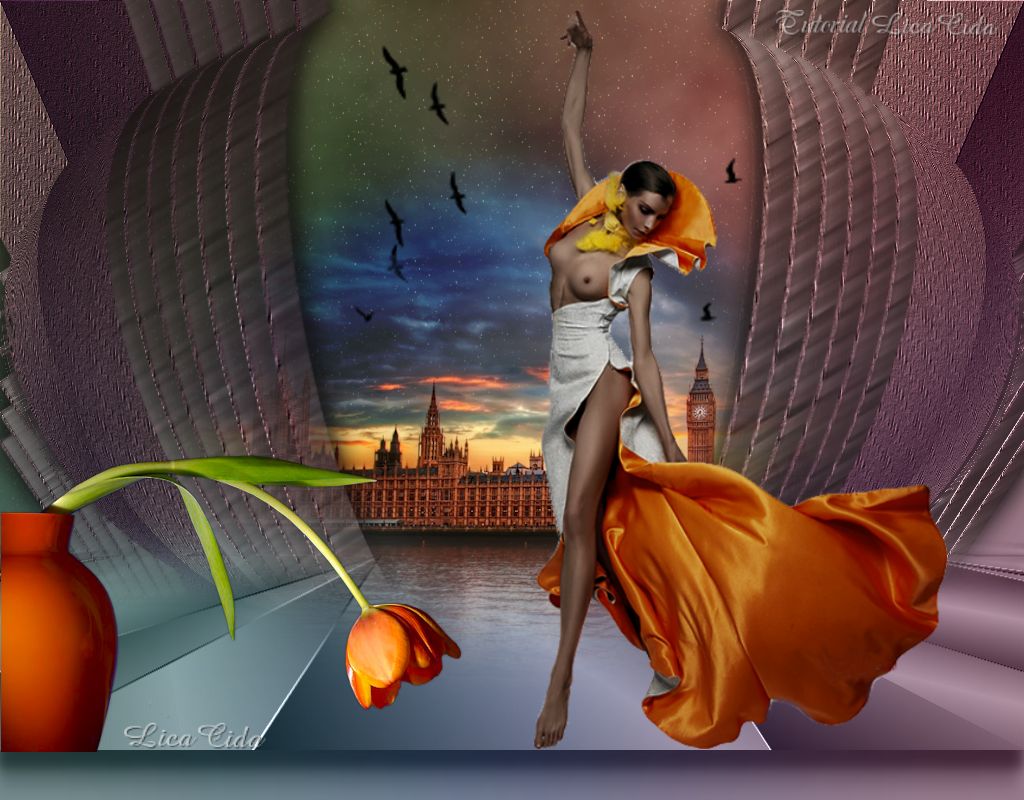
Pintar com o gradiente formado pelas
cores: #3a1840 e #aa9492.
Configurar Linear : Angle 45\ Repeats 1. Invert
desmarcado.
2- New Mask layer\ From
Image... tuile211.

Emboss 3. Layer \ Merge \
Merge Group.
3- Image Mirror. Repetir os
passos do ítem 2.
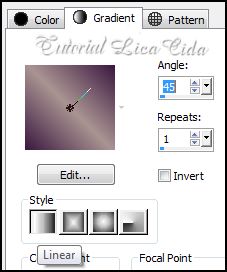
4-Ativar a ferramenta Selection \Rectangle . Ou
tecla S. Em Custom selection configure :
Delete . Selections \
Select none.
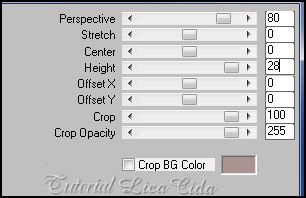
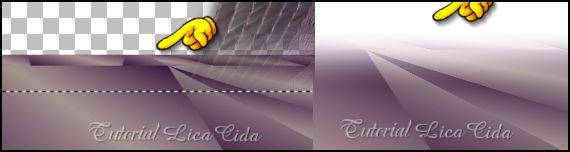
5-Effects\ Geometric Effects\ Perspective
Vertical \D= 50\ Wrap.
6-
Effects\ Texture Effects\ Texture.
 7-Adjust \ Add \ Remove Noise\ JPEG Artifact Removal. Maximum\80.
8-Plugin FMTT\ Blend Emboss.
Default.
9-Image \Canvas Size _1024 x 650 _Bottom
50.
10-Effects\ Geometric Effects \ Spherize 100
\ Ellipse .
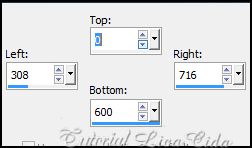
11-Plugin Alien Skin Eye Candy 5 : Impact\
Extrude.
 Effects \ 3D Effects \ Drop Shadow
0\0\80\40,00 Color=#000000.
12-Aplicar a Mask !!!!.mask.ket-fadesuave ( usar
duas\tres vezes ) . Layer \Merge \ Merge Group.
13-Image \Canvas Size
_1024 x 750 _Bottom 100.
14-Nova Layer.
Layers\ Arrange \Send to Bottom. Pintar com o mesmo gradiente formado no
ítem 1.
Repetir o
ítem 5 .
15-Plugin MuRa's Meister\
Perspective Tiling.
 Com a Ferramenta
Magic Wand _Default_ selecionar a parte transparente. Selections \
Modify \ Feather 60 pxls - Deletar (quatro\cinco vezes ,
retirar a marca aparente).
 Selections \ Select
none. Emboss3.
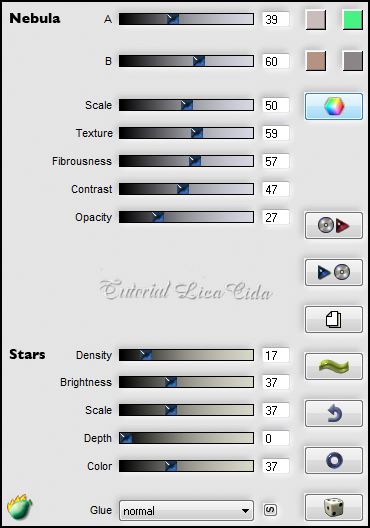
16-Nova layer. Plugin
Flaming Pear\ Glitterato...
 17-Plugin DC Layer\
SideMerge.
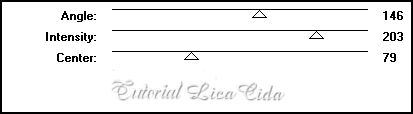 18-Plugin nik Color Efex Pro!1.0
\ Graduated User Defined.
Color= #aa9492 ( cor do
background ). 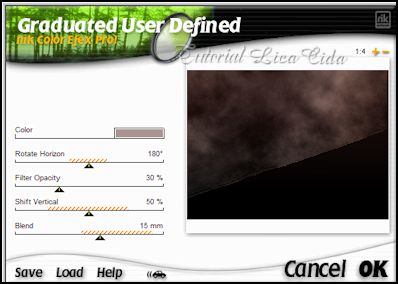 19-Image \Canvas Size _1024
x 800 _Bottom 50.
Nova Layer. Layers\
Arrange \Send to Bottom. Pintar com a cor #aa9492 ( cor do
background ).
LAYERS 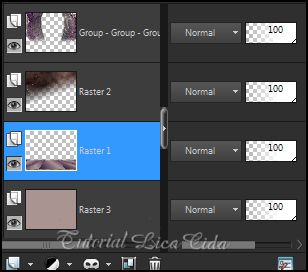 20- Ativar a Raster 1.
Effects \ 3D Effects \ Drop Shadow 18\(menos)-2\50\18,00.
Color=#000000.
21- Copy no tube TubeNP
974 paisagem .Paste As New Layer .
22- Ativar a Raster 3.
Layer Duplicate . Plugin
UnPlugged Effects\ Disco Lights...
 Adjust\ Blur\ Gaussian
Blur . R=100
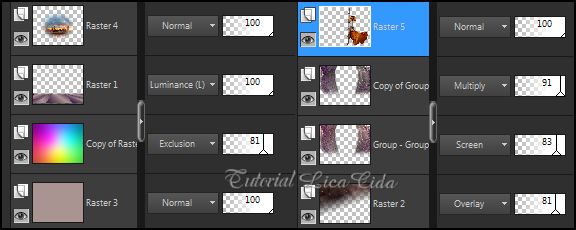
23- Ativar a Layer
superior. Copy no tube1280_mulher_mara_pontes .Paste As
New Layer . Resize e posicionamento. Uso a
gosto.
24-Copy no tube5High
Style_LR .Paste As New Layer . Mirror . Resize
80%.Posicione.
25-Layers\ Blends e
Opacitys.
( duplique o efeito
principal e na layer original repita o ítem 18 )
 Faça a gosto o
acabamento do seu top.
Aplicar a Marca
D'agua.
Assine e
salve.
Espero que
gostem. Aparecida / Licacida, Janeiro de
2014.
Brasil    |