|
|
|
|
|
VERSÕES AMIGAS
Tag
"Zane"
Preset
Illumination\ Lights \ lightsl3bllc (guardar em sua pasta de Presets My
PSP Files)
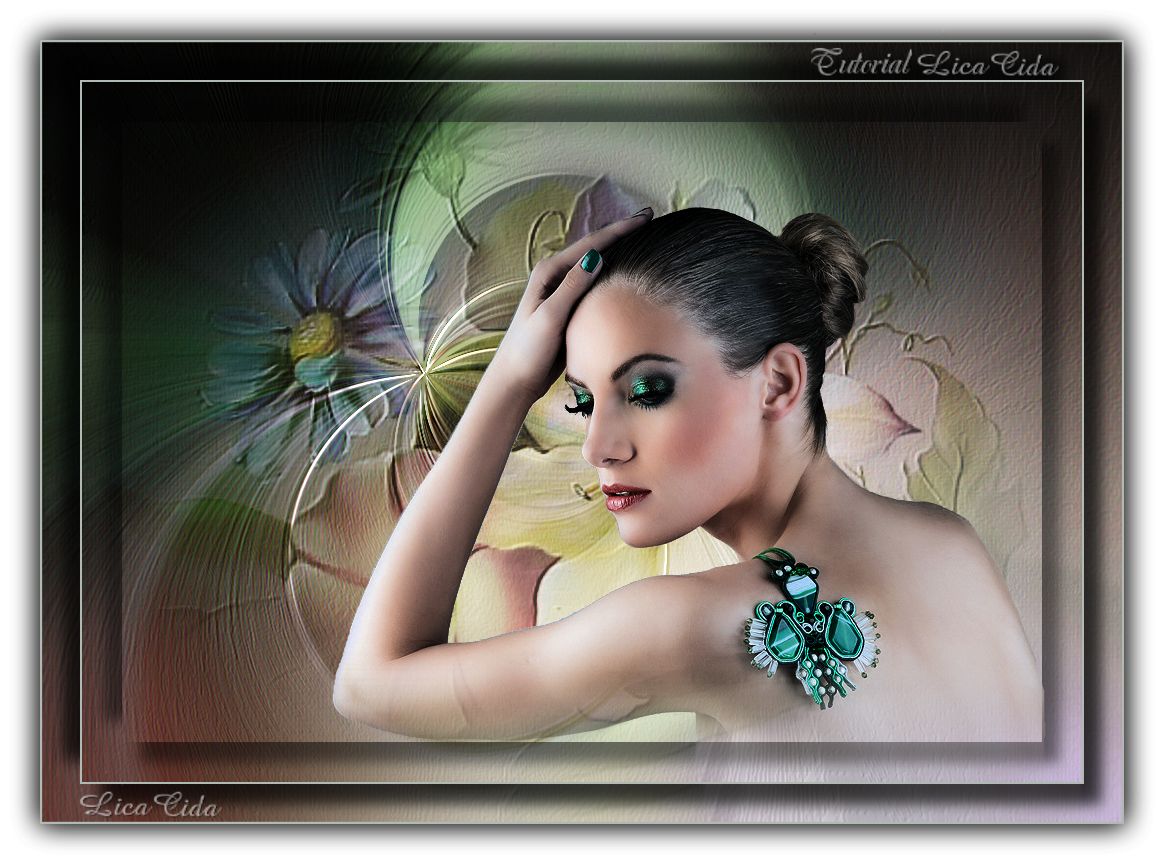
Tubes: tube1852_mulher_mara_pontes \
tubefloral .
( arquivo net, darei os creditos qdo souber
autor).
Back:
BACK6-RB \Regina Barbeiro.
Mask:
!!!!.mask.ket-fadesuave. Marca
D'água. Efeitos do
PSP.
Versão
usada PSPX6
Plugins
Plugin Mehdi \ Wavy Lab... Plugin Flaming Pear\ Flexify 2... Plugin VM Natural \ Marble Madness...
Tutorial _Roteiro
Configurar
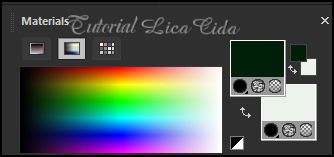
Background:
#00200c \ Foreground: #ebf2eb.
1- Abrir uma nova imagem transparente de 1000 x 700 pxls.
2- Plugin Mehdi \ Wavy Lab...
 3- New Layer.
Selections\ Select All . Edit
copy tube1852_mulher_mara_pontes\ Edit Paste Into
Selection . Selections \ Select
none.
4-Effects\ Image
Effects\Seamless Tiling: Default.
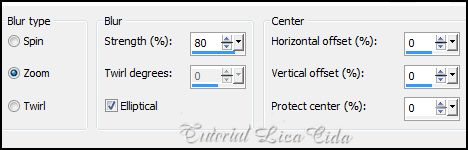
5- Adjust\ Blur\ Radial
Blur.
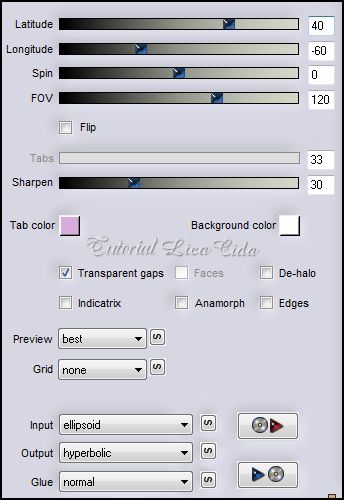
 6-Plugin Flaming Pear\ Flexify
2...
 Emboss3.
7-Plugin VM Natural \ Marble
Madness...
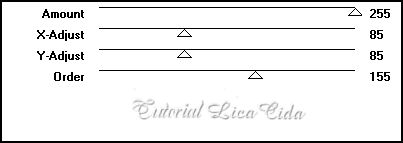
* Repetir o Plugin VM
Natural \ Marble Madness...(( mesmos valores acima
)).
Emboss3.
8-Selections\ Select All .
Selections\ Modify Contract \
pxls: 40.
9-Effects \ 3D Effects \ Drop
Shadow.
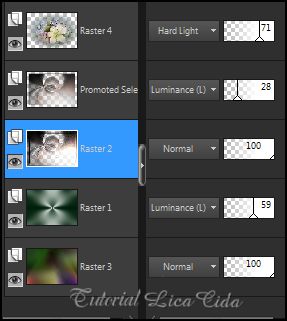
 10- Promote Selection to Layer.
Selections \ Select none.
11- Ativar a
Raster1.
Adjust\ Blur\ Radial
Blur.
12-New Layer. Arrange\ Send to
Botton.
Select all \ Edit copy no BACK6-RB\ Edit Paste Into Selection . Selections \ Select None.
13- Ativar a layer superior ( Promoted Selection ). New Layer. Select all \ Edit copy no floral\ Edit Paste Into Selection . Selections \ Select None.
Emboss3.
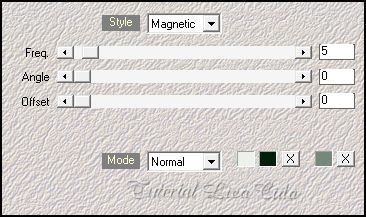
14-Ativar Raster2. Effects \Illumination Effects \ Preset Illumination\Lights\ lights3bllc.
Emboss3.
15-*Repetir o Plugin VM Natural \ Marble Madness...(( mesmos valores ítem 7)).
Layers\ Blends\ Opacitys.
16- Ativar a Raster 4 . Edit Copy no tube1852_mulher_mara_pontes \ Paste As New Layer .
*Dependendo do tube que vai usar, suavise a base com a mask !!!!.mask.ket-fadesuave. Merge \ Group. Posicione a gosto.
17-Ativar Raster1. Effects \Illumination Effects \ Preset Illumination\Lights\ lights3bllc.
18-Image \Add Borders \2 pxls symmetric marcado. Color=#ebf2eb( cor clara) .
*Edit Copy
19-Image / Add Borders / 40 pxls symmetric marcado. Color=#ffffff. Selecione .
20-Edit Paste Into Selection . Selections \ Invert.
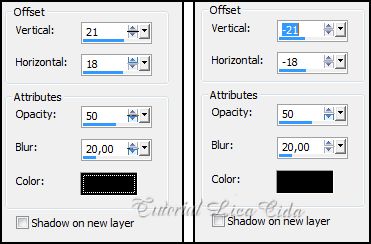
21- Effects \ 3D Effects \ Drop Shadow.
Selections \ Select None.
22-Image \Add Borders \ 40 pxls symmetric marcado. Color=#ffffff ou a gosto. Selecione . Selections \ Invert.
*Repetir o ítem 21. Effects \ 3D Effects \ Drop Shadow.
Aplicar a Marca D'agua.
Assine e salve em JPG.
Espero que gostem .
Rio
de Janeiro , Maio de 2014.
Aparecida/Licacida
Brasil.

|