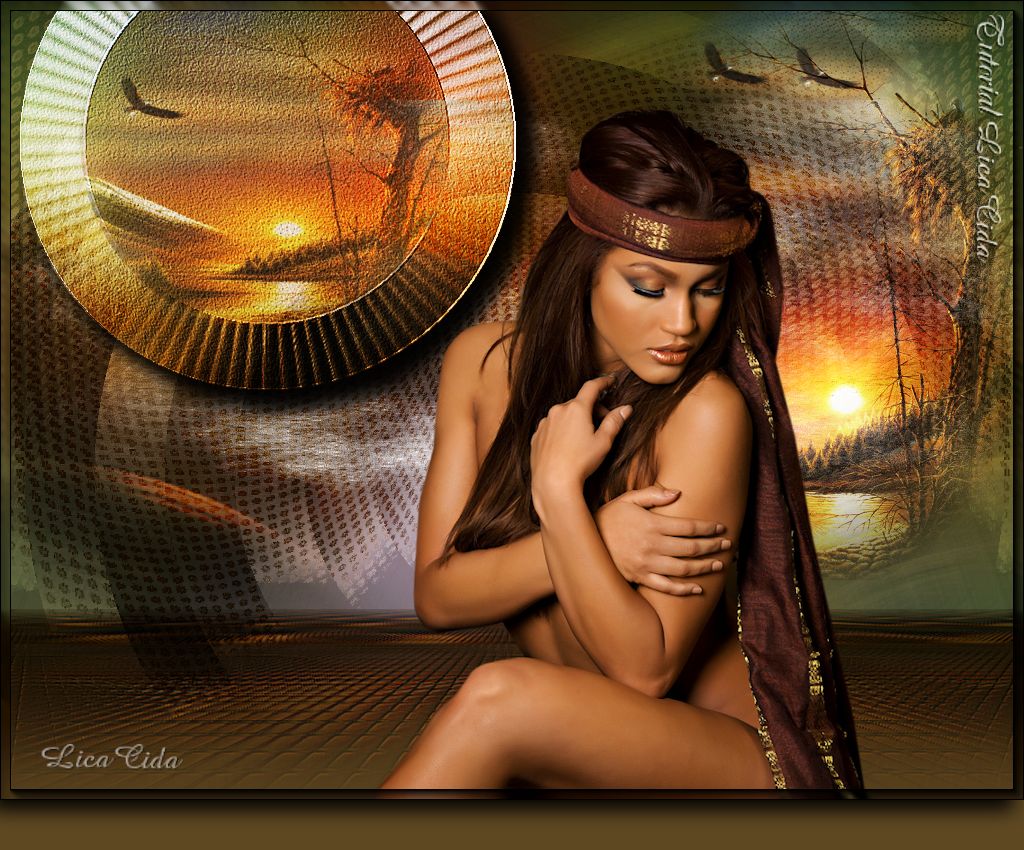
"Top Woman Dreams"
Dedico a querida amiga Carmen Teles, com
carinho!!
Material
Tubes: k@rine_
dreams _Woman_Dreams_1590/ Tubed by
Monique42
Masks: Mask : aditascreations_mask_60 \
Mask !!!!.mask.ket-fadesuave
Back: colorida4_rb.
Elemento: luminosidade "WW"( arquivo net)
\ elemento1lc"WW".
Marca D'água.
Efeitos do PSP.
Versão usada PSPX5
Plugins
Plugin It@lian Editors
Effects \ Raggi di Luce.
Plugin FMTT\ Blend
Emboss.
Plugin MuRa's Meister/
Perspective Tiling.
Tutorial
_Roteiro
1- Abrir
uma nova imagem transparente 1024x600.
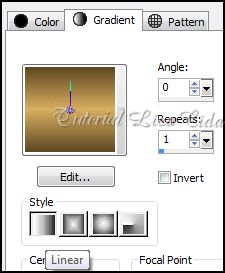
_Pintar com o gradiente
formado pelas cores: #5e4822 e #d8ad60 . Configurar Linear : Angle 0
/ Repeats 1. Invert desmarcado.
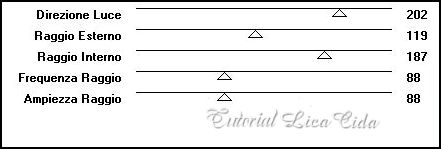
2-Plugin It@lian
Editors Effects \ Raggi di Luce.
_Adjust / Add/ Remove Noise/ JPEG Artifact Removal.
Maximum \
100.
_Plugin FMTT\ Blend
Emboss.
_Effects/ Image Effects Offset.
(menos) -225\ 160.
C\T.
_Effects
/ 3D Effects / Drop Shadow. 10\ -10\ 100\ 30,00
. Color=#000000.
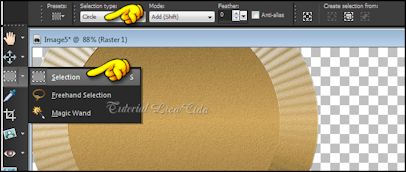
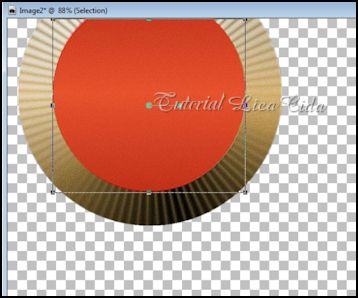
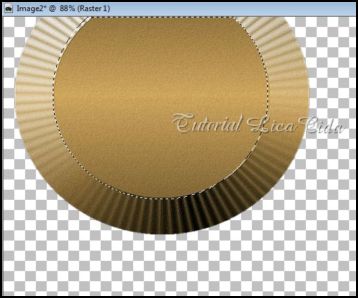
3- Com a
Ferramenta Selection \ Circle ( veja print ). Faça um contorno na parte lisa do
efeito.
_Selections\ Edit
Selections.
4-Ativar a
Ferramenta Pick ( mode Scale ) . Usar para aumentar ou
diminuir o circulo formado. Ajustar sobre o efeito como mostra o
print.
_Selections\ Edit
Selections.
 _Selections\ Modify\ Expandy \
4.
5-New Layer.
_ Select all \ Edit Copy no Tubed by Monique42 \
Edit Paste Into Selection . Duplicar essa layer para melhor
visualizar o tube
( três
vezes).
_Layer\
Merge\ Merge Down ( duas vezes ) até Raster2 .
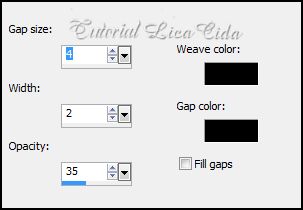
_Effects\
Texture Effects\ Wave.
_Selections\ Modify\ Expandy \
4.
5-New Layer.
_ Select all \ Edit Copy no Tubed by Monique42 \
Edit Paste Into Selection . Duplicar essa layer para melhor
visualizar o tube
( três
vezes).
_Layer\
Merge\ Merge Down ( duas vezes ) até Raster2 .
_Effects\
Texture Effects\ Wave.
 _Selections / Select none.
6-New Layer . Arrange \ Send to Botton . Pintar com a cor usada no Foreground
_#5e4822.
_Aplicar a Mask
: aditascreations_mask_60. Effects\ Edge Effects\ Enhance More. Layer/
Merge / Merge Group.
7-Layer
Duplicate . Layer\ Merge \ Down.
_Effects / 3D Effects / Drop Shadow. 2\ 2\ 100\
2,00 . Color=#000000.
_Effects\ Distortion Effects Wave.
0\100\20\90 Transparent.
8-Image /Canvas Size _1024 x 800 _Bottom
200.
9-New Layer. Layer\ Arrange \ Send to
Botton . Pintar com o mesmo gradiente formado no ítem
1.
_ Select all \ Edit Copy no Tubed by Monique42 \
Edit Paste Into Selection . Selections / Select none.
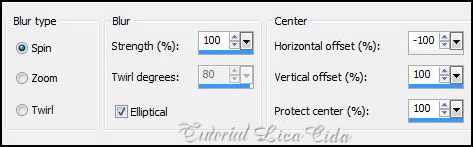
10-Adjust\ Blur\ Radial Blur...
_Selections / Select none.
6-New Layer . Arrange \ Send to Botton . Pintar com a cor usada no Foreground
_#5e4822.
_Aplicar a Mask
: aditascreations_mask_60. Effects\ Edge Effects\ Enhance More. Layer/
Merge / Merge Group.
7-Layer
Duplicate . Layer\ Merge \ Down.
_Effects / 3D Effects / Drop Shadow. 2\ 2\ 100\
2,00 . Color=#000000.
_Effects\ Distortion Effects Wave.
0\100\20\90 Transparent.
8-Image /Canvas Size _1024 x 800 _Bottom
200.
9-New Layer. Layer\ Arrange \ Send to
Botton . Pintar com o mesmo gradiente formado no ítem
1.
_ Select all \ Edit Copy no Tubed by Monique42 \
Edit Paste Into Selection . Selections / Select none.
10-Adjust\ Blur\ Radial Blur...
 _Layer Duplicate. Image Mirror. Blend Mode= Soft
Light.
_Layer\ Merge \ Merge Down. Emboss5.
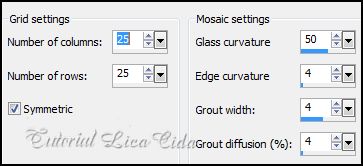
11- Layer Duplicate. Effects\ Texture Effects\
Mosaic-Glass.
_Layer Duplicate. Image Mirror. Blend Mode= Soft
Light.
_Layer\ Merge \ Merge Down. Emboss5.
11- Layer Duplicate. Effects\ Texture Effects\
Mosaic-Glass.
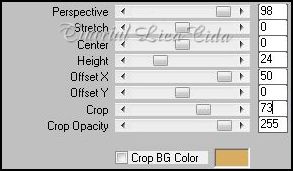
 12-Plugin MuRa's Meister/ Perspective Tiling.
 13-Effects/ Image
Effects/ Seamless Tiling: Side by side. _ Selecione com a
Ferramenta Magic Wand _ configurações Default_ a parte superior (
a transparente ) .
13-Effects/ Image
Effects/ Seamless Tiling: Side by side. _ Selecione com a
Ferramenta Magic Wand _ configurações Default_ a parte superior (
a transparente ) .
_Selections\ Modify\ Feather \ 30 . Delete
( duas a três vezes). Selections / Select none.
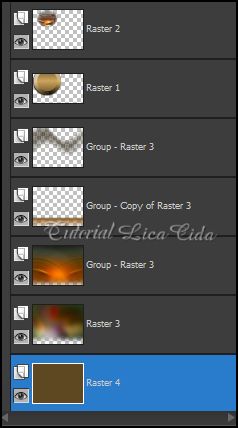
_LAYERS_
 14-Aplicar a Mask
!!!!.mask.ket-fadesuave nesta layer ( copy of Raster 3) Layer / Merge /
Merge Group. Repetir a mask na Raster 3.
_Aplicar o Plugin Nik Software/ Color EfexPro 3.0 \
Bi-Color filters . ( nas melhores configurações para as cores usadas
).
_Effects / 3D Effects /
Drop Shadow. 2\ 2\ 100\ 2,00
. Color=#000000.
15- New Layer.
Arrange \ Send to Botton . Select all / Edit Copy no
colorida4_rb / Edit Paste Into Selection . Selections / Select none.
_Repetir ítem 14 ( a
mask.Ket-fadesuave).
16-New Layer. Arrange \ Send to
Botton . Pintar com a cor usada no Foreground
_#5e4822.
_LAYERS_
14-Aplicar a Mask
!!!!.mask.ket-fadesuave nesta layer ( copy of Raster 3) Layer / Merge /
Merge Group. Repetir a mask na Raster 3.
_Aplicar o Plugin Nik Software/ Color EfexPro 3.0 \
Bi-Color filters . ( nas melhores configurações para as cores usadas
).
_Effects / 3D Effects /
Drop Shadow. 2\ 2\ 100\ 2,00
. Color=#000000.
15- New Layer.
Arrange \ Send to Botton . Select all / Edit Copy no
colorida4_rb / Edit Paste Into Selection . Selections / Select none.
_Repetir ítem 14 ( a
mask.Ket-fadesuave).
16-New Layer. Arrange \ Send to
Botton . Pintar com a cor usada no Foreground
_#5e4822.
_LAYERS_
 17-Ativar a Raster 1.Edit
Copy no elemento_1lc "WW" Paste as New
Layer.
_Effects/ Image Effects Offset. 0\20
C\T.
18-
Ativar a Layer Group-Raster 3. Edit Copy no elemento luminosidade"WW"
\ Paste as New Layer.
17-Ativar a Raster 1.Edit
Copy no elemento_1lc "WW" Paste as New
Layer.
_Effects/ Image Effects Offset. 0\20
C\T.
18-
Ativar a Layer Group-Raster 3. Edit Copy no elemento luminosidade"WW"
\ Paste as New Layer.
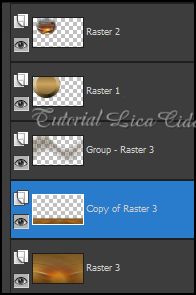
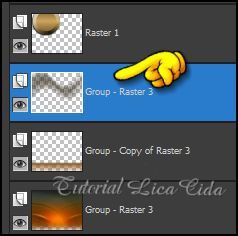 19-Ativar a Layer Group-Copy of Raster 3. Edit Copy
no Tubed by Monique42 \Paste as New Layer. Posicione a
direita. Decore a gosto.
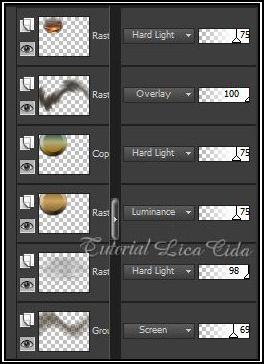
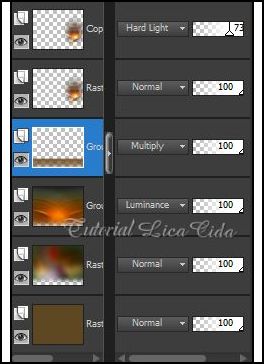
_LAYERS \ BLENDS \
OPACITYS_
19-Ativar a Layer Group-Copy of Raster 3. Edit Copy
no Tubed by Monique42 \Paste as New Layer. Posicione a
direita. Decore a gosto.
_LAYERS \ BLENDS \
OPACITYS_
 20-Ativar a layer superior. Edit Copy no tube k@rine_ dreams _Woman_Dreams_1590/
Paste As New Layer. Posicione
.
_Aplicar a
Marca D'agua.
_Assine e salve.
Espero que gostem.
Aparecida / Licacida, Junho de 2013.
20-Ativar a layer superior. Edit Copy no tube k@rine_ dreams _Woman_Dreams_1590/
Paste As New Layer. Posicione
.
_Aplicar a
Marca D'agua.
_Assine e salve.
Espero que gostem.
Aparecida / Licacida, Junho de 2013.
Rio de
Janeiro_Brasil
"Top Woman Dreams"
Dedico a querida amiga Carmen Teles, com carinho!!
Material
Tubes: k@rine_ dreams _Woman_Dreams_1590/ Tubed by Monique42
Masks: Mask : aditascreations_mask_60 \ Mask !!!!.mask.ket-fadesuave
Back: colorida4_rb.
Elemento: luminosidade "WW"( arquivo net) \ elemento1lc"WW".
Marca D'água.
Efeitos do PSP.
Marca D'água.
Efeitos do PSP.
Versão usada PSPX5
Plugins
Plugin It@lian Editors
Effects \ Raggi di Luce.
Plugin FMTT\ Blend
Emboss.
Plugin MuRa's Meister/
Perspective Tiling.
Tutorial
_Roteiro
Versão usada PSPX5
Plugins
Plugin It@lian Editors
Effects \ Raggi di Luce.
Plugin FMTT\ Blend
Emboss.
Plugin MuRa's Meister/
Perspective Tiling.
Tutorial
_Roteiro
1- Abrir uma nova imagem transparente 1024x600.
_Pintar com o gradiente
formado pelas cores: #5e4822 e #d8ad60 . Configurar Linear : Angle 0
/ Repeats 1. Invert desmarcado.
2-Plugin It@lian Editors Effects \ Raggi di Luce.
_Adjust / Add/ Remove Noise/ JPEG Artifact Removal. Maximum \ 100.
_Plugin FMTT\ Blend Emboss._Effects/ Image Effects Offset. (menos) -225\ 160. C\T.
_Effects
/ 3D Effects / Drop Shadow. 10\ -10\ 100\ 30,00
. Color=#000000.
3- Com a Ferramenta Selection \ Circle ( veja print ). Faça um contorno na parte lisa do efeito.
_Selections\ Edit Selections.
4-Ativar a Ferramenta Pick ( mode Scale ) . Usar para aumentar ou diminuir o circulo formado. Ajustar sobre o efeito como mostra o print.
_Selections\ Edit
Selections.
_Selections\ Modify\ Expandy \
4.
5-New Layer.
_ Select all \ Edit Copy no Tubed by Monique42 \
Edit Paste Into Selection . Duplicar essa layer para melhor
visualizar o tube
( três
vezes).
_Layer\
Merge\ Merge Down ( duas vezes ) até Raster2 .
_Effects\
Texture Effects\ Wave.
_Selections / Select none.
6-New Layer . Arrange \ Send to Botton . Pintar com a cor usada no Foreground
_#5e4822.
_Aplicar a Mask
: aditascreations_mask_60. Effects\ Edge Effects\ Enhance More. Layer/
Merge / Merge Group.
7-Layer
Duplicate . Layer\ Merge \ Down.
_Effects / 3D Effects / Drop Shadow. 2\ 2\ 100\
2,00 . Color=#000000.
_Effects\ Distortion Effects Wave.
0\100\20\90 Transparent.
8-Image /Canvas Size _1024 x 800 _Bottom
200.
9-New Layer. Layer\ Arrange \ Send to
Botton . Pintar com o mesmo gradiente formado no ítem
1.
_ Select all \ Edit Copy no Tubed by Monique42 \
Edit Paste Into Selection . Selections / Select none.
10-Adjust\ Blur\ Radial Blur...
_Layer Duplicate. Image Mirror. Blend Mode= Soft
Light.
_Layer\ Merge \ Merge Down. Emboss5.
11- Layer Duplicate. Effects\ Texture Effects\
Mosaic-Glass.
12-Plugin MuRa's Meister/ Perspective Tiling.
13-Effects/ Image
Effects/ Seamless Tiling: Side by side. _ Selecione com a
Ferramenta Magic Wand _ configurações Default_ a parte superior (
a transparente ) .
_Selections\ Modify\ Feather \ 30 . Delete
( duas a três vezes). Selections / Select none.
_LAYERS_
14-Aplicar a Mask
!!!!.mask.ket-fadesuave nesta layer ( copy of Raster 3) Layer / Merge /
Merge Group. Repetir a mask na Raster 3.
_Aplicar o Plugin Nik Software/ Color EfexPro 3.0 \
Bi-Color filters . ( nas melhores configurações para as cores usadas
).
_Effects / 3D Effects /
Drop Shadow. 2\ 2\ 100\ 2,00
. Color=#000000.
15- New Layer.
Arrange \ Send to Botton . Select all / Edit Copy no
colorida4_rb / Edit Paste Into Selection . Selections / Select none.
_Repetir ítem 14 ( a
mask.Ket-fadesuave).
16-New Layer. Arrange \ Send to
Botton . Pintar com a cor usada no Foreground
_#5e4822.
_LAYERS_
17-Ativar a Raster 1.Edit
Copy no elemento_1lc "WW" Paste as New
Layer.
_Effects/ Image Effects Offset. 0\20
C\T.
18-
Ativar a Layer Group-Raster 3. Edit Copy no elemento luminosidade"WW"
\ Paste as New Layer.
19-Ativar a Layer Group-Copy of Raster 3. Edit Copy
no Tubed by Monique42 \Paste as New Layer. Posicione a
direita. Decore a gosto.
_LAYERS \ BLENDS \
OPACITYS_
20-Ativar a layer superior. Edit Copy no tube k@rine_ dreams _Woman_Dreams_1590/
Paste As New Layer. Posicione
.
_Aplicar a
Marca D'agua.
_Assine e salve.
Espero que gostem.
Aparecida / Licacida, Junho de 2013.
Rio de
Janeiro_Brasil
5-New Layer.
_ Select all \ Edit Copy no Tubed by Monique42 \
Edit Paste Into Selection . Duplicar essa layer para melhor
visualizar o tube
( três
vezes).
_Layer\
Merge\ Merge Down ( duas vezes ) até Raster2 .
_Effects\
Texture Effects\ Wave.
8-Image /Canvas Size _1024 x 800 _Bottom
200.
9-New Layer. Layer\ Arrange \ Send to
Botton . Pintar com o mesmo gradiente formado no ítem
1.
_ Select all \ Edit Copy no Tubed by Monique42 \
Edit Paste Into Selection . Selections / Select none.
10-Adjust\ Blur\ Radial Blur...
_Layer Duplicate. Image Mirror. Blend Mode= Soft
Light.
_Layer\ Merge \ Merge Down. Emboss5.
11- Layer Duplicate. Effects\ Texture Effects\
Mosaic-Glass.
12-Plugin MuRa's Meister/ Perspective Tiling.
13-Effects/ Image
Effects/ Seamless Tiling: Side by side. _ Selecione com a
Ferramenta Magic Wand _ configurações Default_ a parte superior (
a transparente ) .
_Selections\ Modify\ Feather \ 30 . Delete ( duas a três vezes). Selections / Select none.
_LAYERS_
14-Aplicar a Mask
!!!!.mask.ket-fadesuave nesta layer ( copy of Raster 3) Layer / Merge /
Merge Group. Repetir a mask na Raster 3.
_Aplicar o Plugin Nik Software/ Color EfexPro 3.0 \
Bi-Color filters . ( nas melhores configurações para as cores usadas
).
_Effects / 3D Effects /
Drop Shadow. 2\ 2\ 100\ 2,00
. Color=#000000.
15- New Layer.
Arrange \ Send to Botton . Select all / Edit Copy no
colorida4_rb / Edit Paste Into Selection . Selections / Select none.
_Repetir ítem 14 ( a
mask.Ket-fadesuave).
_LAYERS_
_Aplicar a
Marca D'agua.
_Assine e salve.
Espero que gostem.
Aparecida / Licacida, Junho de 2013.
Rio de Janeiro_Brasil