
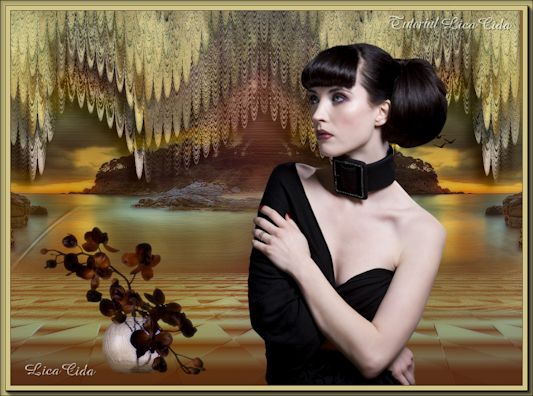
Tutorial
Tutorial "Top Ainda Aqui...Lúcia Di Pietro"
Dedico a amiga de sempre.
Tubes:SvB Zee 12 misted \ kittys-flowers\
kittys-Damegala.
Mask!!!!.mask.ket-fadesuave.
Marca
D'água.
Efeitos do PSP.
Versão usada
PSPX5
Plugins
Plugin VM Instant Art \
Tripolis.
Flaming Pear \
Flexify
Plugin MuRa's Meister / Perspective Tiling
/ Copies
MuR'as Seamless -
Shift at Arch.
Plugin Adjust\
Variations
Plugin Xero \
Porcelain
Tutorial _Roteiro
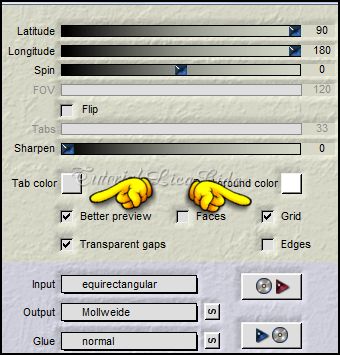
1- Abrir uma nova imagem transparente 1024x600.
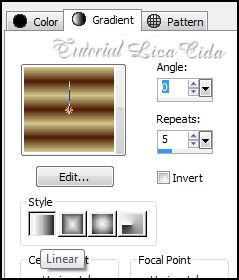
_Pintar com o gradiente formado pelas cores: #d1c589 e #4d1b04. Configurar Linear : Angle 0 / Repeats 5. Invert desmarcado.
2- Plugin VM Instant Art \ Tripolis _ Default.
_Emboss 3.
_Layer Duplicate \ Repita: Plugin VM Instant Art \ Tripolis _ Default.
_Emboss 3.
3-Selections \ Select
All . Selections \Modify\ Contract 70. / Deletar
.
_Selections \ Invert.
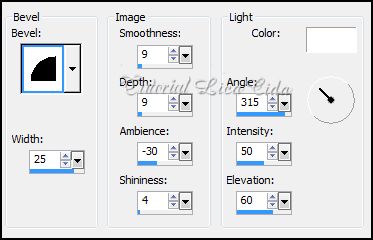
_Effects / 3D Effects / Inner
Bevel.
_Selections / Select
none.
_ Resize 80%.
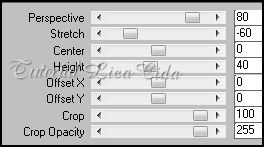
4-Effects\ Geometric Effects \
Perspective Vertical .
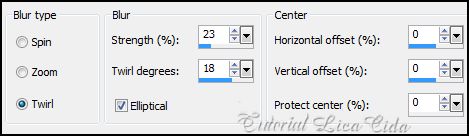
5-Effects \ Distortion Effects \ Polar
Coordinates.
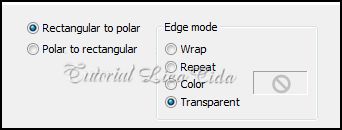
_Image \ Resize 80% .
Image Flip.
6- Flaming Pear \
Flexify.
_Selecione a parte branca com a ferramenta
Magic Wand , tolerance 10. Delete.
_Selections / Select
none.
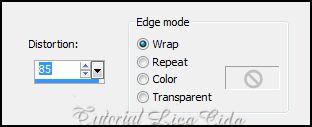
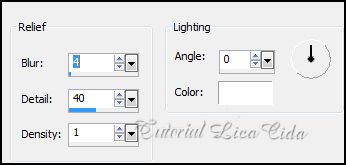
_Effects\ Distortion Effects\ Pinch
100.
7-Plugin MuRa's Meister \ Copies :
Curve ( horizontal).
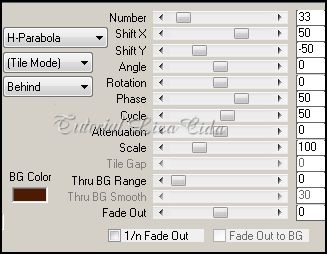
_Effects / Image effects /Offset:
H= 350/ V=95. Custom e Transparent marcados.
_Layer\
Duplicate. Image\ Mirror. Layer \ Merge
Dow.
8-Duplicar
a layer.
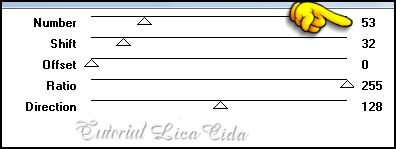
_Plugin
MuR'as Seamless\ Shift at Arch.
_ Layer\
Arrange\ Move Dow.
_Ativar a layer
superior_
_Repetir o
efeito ( ítem 8 ).
_Effects / Image effects /Offset:
H= 0 \ V= 95. Custom e Transparent
marcados.
_Effects / 3D effects / Drop Shadow:
10/ -10/ 70 / 20,00 . Color=#000000 e
também
aplicar na layer abaixo : Copy (2) of
Raster 1.
9-Canvas Size 1024 x 750 _ Botton
150.
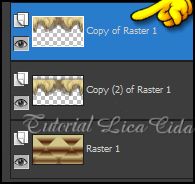
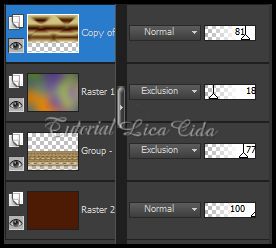
10-Ativar a Raster 1 \ Duplicar.
_Adjust \ Blur \ Radial
Blur
_Effects\ Artistic Effects\ Enamel.
_Aplicar duas vezes.
_Suspender a layer a
gosto.
11-Ativar a Raster1.
_Plugin MuRa's Meister/ Perspective Tiling.
_Emboss
3.
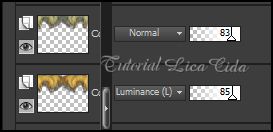
12- Aplicar a Mask !!!!.mask.ket-fadesuave.
Layer / Merge / Merge Group.
13-Nova layer . Selections\
Select all . Edit Copy no coloridorb /
Edit Paste Into Selection.
_Select none.
14-Layers / New Raster Layer. Arrange/Send to Botton.

_Pintar com uma cor que combine ( usei a
cor #4d1b04).
_ Blends Modes e
Opacitys_
15- Nas layers dos
efeitos:
_Plugin Adjust\ Variations
.
Clicar em Original \ Usar
cores a gosto.
_Plugin Xero \ Porcelain_
default.
16-Edit Copy no
tube SvB Zee 12 misted \Paste As New Layer .
Posicione.
17-Edit Copy no tube k
ittys-flowers \ Paste As New Layer .
Posicione.
18- Edit Copy no tube
kittys-Damegala\ Paste As New Layer .
Posicione.
Aplicar a
Marca D'agua.
Assine e
salve.
_Formate e
decore seu top a gosto.
Espero que
gostem.
Aparecida /
Licacida, Abril de 2013.
Rio de Janeiro_Brasil