|
"Uschi"
Material
Aqui
Preset Katrina_mp\ do Eye Candy\ Impact \ Glass.
( dar duplo clic sobre o preset para importa-lo ao Plugin )
Seleções: Imagem "alphachanneluschi " _ Seleção1_Sele��o2.
Guardadas em Canal Alpha a Imagem "uschi " .
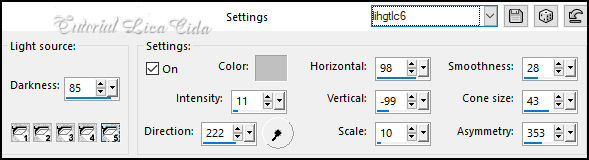
Preset Illumination\ Lights_lights \lights_lc6 ( Guardar em sua
pasta de Presets My PSP Files).
Tubes:Callitubes-2607mulheres\vvs-paisagem0717\Callitubes-275flores.
Deco:deco-MJ\ deco1_bylc\deco2_bylc
Titulo:titulouschi_bylc.
(Agradeço)
Marca D'agua .
Efeitos do PSP.
Plugins
*Plugin Alien Skin Eye Candy 5
Plugins MuRa's Meister
Plugins Texture
Tutorial
Configurar
Foreground _#9ea074 ( cor clara) \ #0f190f _Background ( cor escura)
1-Abrir o arquivo alphachanneluschi.
_Preencher com o gradiente Linear. Angle 90 \Repeats0. Invert
marcado. Formado pelas cores configuradas acima.
,
2-Layers \ New Raster Layer.
_Selections \Load \ Save Selection \Load Selection From AlphaChannel
\ Selection#1.
_Preencher com o mesmo gradiente.
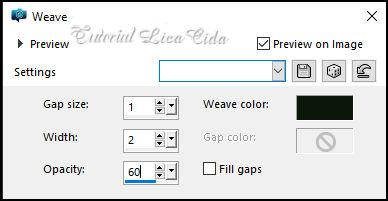
3- Effects\ Texture Effects\ Weave. (Cor escura)
4-Plugin Alien Skin Eye
Candy 5: Impact \ Glass... Setting\ use Setting Katrina.
Selections\ Select none.
5-Edit \ Copy no Misted Paisagem vvs-paisagem0717 \ Edit \ Paste As
New Layer.
_Posicione. Resize se for necessário.
Adjust \ Sharpness \ Sharpen.
_Layers\ Arrange\ Move Down.
Layer superior ( raster2).
_Layers\ Merge\ Merge Down.
6-Plugins MuRa's Meister\Copies_Curve ( horizontal)

*Plugin Alien Skin Eye Candy 5 :
Impact\ Perspective Shadow_use a gosto.
7-Layers \ New Raster Layer.
Selections \Select All .Edit Copy ( no mesmo) Misted Paisagem ( deve
estar na memória )\
Edit Paste Into Selection . Selections\ Select none.
_Adjust\ Sharpness\ Sharpen
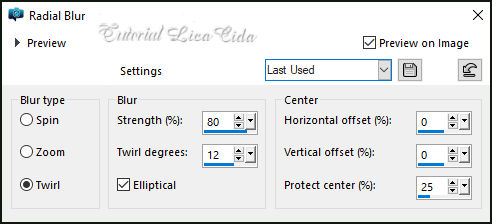
8-Adjust \Blur \Radial Blur.
9-Layers \ Properties General:
Blend Mode\ Overley.
_Layers\ Arrange\ Move Down.
.
Emboss3.
Layers Duplicate.
10-Plugins \ MuRa's Meister_Tone.
Cores (background ).
Layers \ Properties General:
Blend Mode\ Burn.
_Effects \ Edge Effects \ Enhance More.
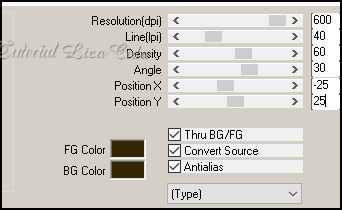
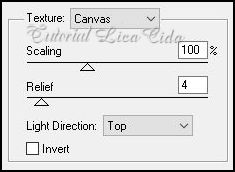
11- Plugins Texture \Texturizer.
Layers Duplicate.
_Layers\ Merge\ Merge Down.
_Layers \ Properties General: Blend Mode\ ( continua ) Overley.
12-Raster1_
_ Image Canvas Size \1024 x 900 . Bottom100.
13-Layers \ New Raster Layer.
Layers\ Arrange send to Bottom. Preencher com o mesmo gradiente.
14-Raster1.
_Effects\ Illumination Effects\ Preset Illumination\ Lights\
lights_lc6.
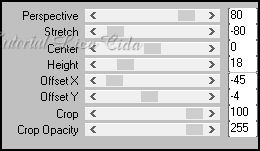
15-Plugin MuRa's Meister \
Perspective Tiling.
*Com a Ferramenta Magic Wand \
Feather 60 \ Clique na parte transparente . Deletar ( quatro\cinco
vezes _ para suavizar o efeito. ).
Selections \ Select none.
*Emboss3.
16-Layer do topo.
_Layers \ New Raster Layer.
_Selections \Load \ Save Selection \Load Selection From AlphaChannel
\ Selection#2.
* Selection\ Edit Selection .
Feramenta Pick Tool usar como modelo para ultrapassar os círculos.

* Selection\ Edit Selection .
17-Flood Fill_Opacity 50% ,pintar com a cor do foreground ( clara).
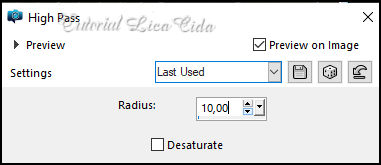
18- Effects\ Edge Effects\High Pass.
_Layers \ Properties General:
Blend Mode\ Overley.
*Plugin Alien Skin Eye Candy 5 : Impact\ Perspective Shadow_use a
gosto.
Selections\ Select none.
* Voltar a normalidade _ Opacity do Flood Fill_100%.
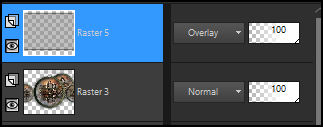
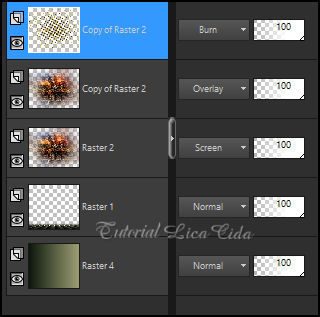
*Duplicar a Raster2 _usar os blends como print.
Layers\Blends\Opacitys
19-Edit Copy no decomj_\ Paste
As New Layer .
Objects\Align\Top ( usar abaixo do efeito MuRa's Meister_Tone).
20-Edit Copy no deco1_bylc_\ Paste As New Layer .
Objects\Align\Top_Objects\Align\Left.
21-Edit Copy no deco2_bylc_\ Paste As New Layer .
Posicione como modelo ( se necessario fechar as layers superiores)
_Layers \ Properties General: Blend Mode\ Luminance(L)
Borders
Image \ Add Borders \ 1 pxl color =escura
Image \ Add Borders \ 3 pxls color =clara
Image \ Add Borders \ 1 pxl color =escura
Selections \ Select All.
Image \ Add Borders \ 30 pxls color = #ffffff.
Invert
_Preencher com o gradiente Linear. Angle 0 \Repeats1. Invert
marcado. Formado pelas cores configuradas acima.
Plugins Graphic Plus\Cross Shadow_Default.
Selections\ Select none.
Image \ Add Borders \ 1 pxl color =escura
Image \ Add Borders \ 3 pxls color =clara
Image \ Add Borders \ 1 pxl color =escura
Selections \ Select All.
Image \ Add Borders \ 50 pxls color = #ffffff.
Invert
_Preencher com o gradiente Linear. Angle 0 \Repeats1. Invert
marcado. Formado pelas cores configuradas acima.
Plugins Graphic Plus\Cross Shadow_Default.
Selections\ Select none.
22-Edit Copy no Callitubes-2607mulheres\ Paste As New Layer .
Posicionamento, Resize e Shadow a gosto.
23-Edit Copy no Callitubes-275flores\ Paste As New Layer .
Posicionamento, Resize e Shadow a gosto.
24-Edit Copy no titulouschi_bylc\ Paste As New Layer .
Posicione
Image \ Add Borders \ 1 pxl color =escura
Image \ Add Borders \ 3 pxls color =clara
Image \ Add Borders \ 1 pxl color =escura
Aplicar a Marca D'agua.
Assine e salve.
Resize _Width 1024 pxls.
Aparecida \ licacida , novembro de 2022.
Espero que apreciem.
Obrigada!

:::...VOLTAR...:::
|
