|
"Crépuscule"
Material
Aqui
Back: colorida4-rb
Tubes:Jeanne_Women_Beauty_29_06_2022\Jeanne achtergr zonsondergang\
Callitubes-152flores
Deko:HuzunluYıllar_16\huzunluyıllar_101\Hüzünlüyıllar_Deko_16\Hüzünlüyıllar_Deko_19.
(Agradeço)
Marca D'água .
Efeitos do PSP.
Plugins
Plugins Mehdi
Plugins Simple
Plugins FunHouse
Plugins MuRa's Meister
Plugins Xero
Plugins Toadies
Filters Convolution Filters
Tutorial
1-Abrir uma nova imagem transparente 1000 x 700 pxls.
2-Selections \Select All .Edit Copy no colorida4-rb ( reserve a
imagem) \ Edit Paste Into Selection .
Selections\ Select none.
Layers Duplicate ( tirar a visibilidade da layer raster1.
3-Adjust\ Add/ Remove Noise \ JPEG Artifactal Removal... ( Maximum\
C=78
_Plugins FMTT\Blend Emboss_Default.
4-Edit Copy no HuzunluYıllar_16 \ Paste As New Layer.
Objects\ Align\ Top.
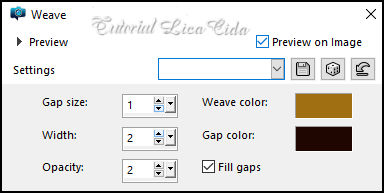
5-Effects\Texture Effects\ Weave.
cores escuras do seu back \#9f6f13 _ #200800.
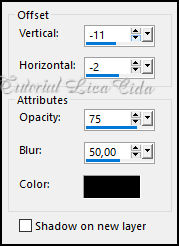
6-Effects \ 3D
Effects \ Drop Shadow
7-Ativar a copy
of raster1.
_ Plugins \ Mehdi\ Sorting Tiles.
8 - Effects \
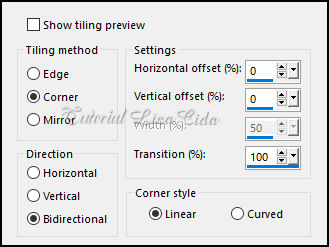
Image Effects \ Seamless Tiling.
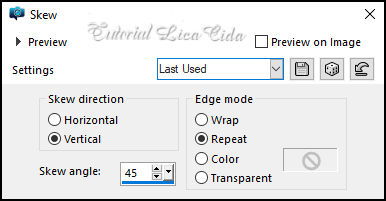
9-Effects\
Geometric Effects\ Skew.
10- Plugins \
Mehdi\ Sorting Tiles.
11- Plugins
Simple\ Centre Tile.
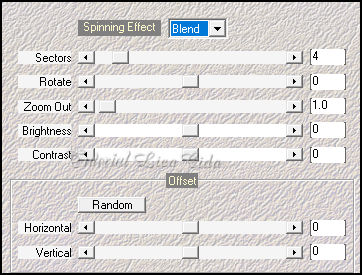
12.- Effects \ Reflection Effects \ Rotating Mirror _ Default.
13-Plugins Mehdi \ Edges FX
( usar um tom mais escuro que o foreground)
#513809
14- Plugins
FunHouse_Loom..._Default.
(o efeito pode hospedar-se em outro plugin)
*Edit \ Repeat.
15-Edit \ Repeat : Effects\Texture Effects\ Weave. ( print ítem 5).
16-Edit Copy no huzunluyıllar_101 \ Paste As New Layer.
Use a Ferramenta Pick Tool \arraste para as laterais.
Tecle M para desativar a ferramenta.
17- Abrir a visibilidade da raster1. Ativar a layer.
*tirar a visibilidade da layer copy of raster1.
_ Plugins Mehdi \ Kaleidoscope 2.1.
_Effects\ Edge
Effects\ Enhance.
18-Image Canvas Size 1000 x 750 . Bottom50.
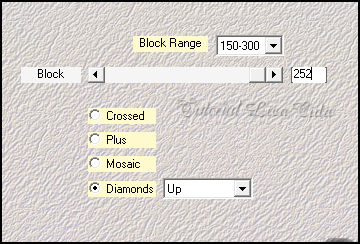
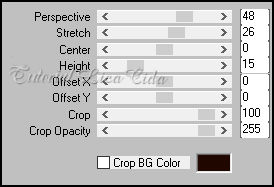
19-Plugins MuRa's Meister/ Perspective Tiling.
20-Effects\
Geometric Effects\ Spherize
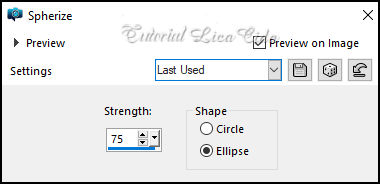
*Emboss3
21-Edit \ Repeat . Effects \ 3D Effects \ Drop Shadow ( print ítem
6).
_Layers\ Arrange \ Move UP.
*Abrir a visibilidade da layer copy of raster1.
.
22-Layer do Topo.
Edit Copy no Hüzünlüyıllar_Deko_16 \ Paste As New Layer.
*Obs: \\Opcional// você poderá mover o efeito ao final da sua versão
de acordo com seu misted.( aqui não mudei)
23- Plugins Xero\ Frittillary_Default.
_Effects\ Edge Effects\ Enhance.
24-Edit \ Repeat . Effects \ 3D Effects \ Drop Shadow ( print ítem
6).
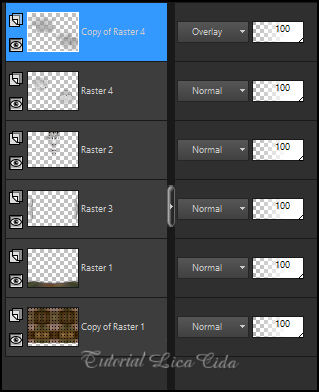
Layers Duplicate
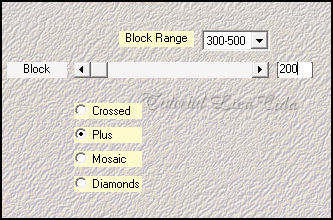
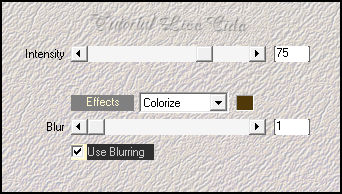
25-Plugins Toadies\ Plain Mosaic Blur
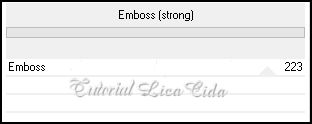
26- Unlimited2 _Filters
Convolution Filters\ Emboss( strong).
27-Edit \ Repeat
. Effects \ 3D Effects \ Drop Shadow ( print ítem 6).
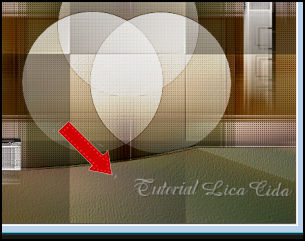
_Layers \ Properties \ General \ Blend Mode : Overlay.
*Usar a borracha Size 70 para limpar o efeito sobre o piso.
**Obs: você NÃO
vai mover o efeito no final da sua versão .
Layers
28-Ativar a
layer Raster1.
Edit Copy no Jeanne achtergr zonsondergang \ Paste As New Layer.
Resize 80%
*Adjust \
Sharpness \ Sharpen. Posicionar à sua escolha.
29-_ Edit Copy no Hüzünlüyıllar_Deko_19 \ Paste As New Layer.
_Objects\ Align\ Top.
30-Plugins Xero\ Frittillary_Default.
_Layers \ Properties \ General \ Blend Mode : Opacity 45%.
_Usar a borracha p dar um acabamento no final do efeito, Size 100.
31- Layer do topo.
Edit Copy no Jeanne_Women_Beauty_29_06_2022 \ Paste As New Layer.
*Adjust \ Sharpness \ Sharpen. Posicionar à sua escolha. Shadow a
gosto.
32- Edit Copy no Callitubes-152flores \ Paste As New Layer.
*Adjust \ Sharpness \ Sharpen. Posicionar à sua escolha. Shadow a
gosto.
Borders
Image \ Add Borders \ 1 pxl color #200800.
*Plugins AAA Filters _ Custom\ Landscape.
Selections \ Select All.
Image \ Add Borders \ 40 pxls color #ffffff.
Invert.
Colar dentro da seleção a imagem reserada ( colorida4-rb ).
Edit \ Repeat: Effects\Texture Effects\ Weave ( ítem 5).
Plugins FunHouse_Loom..._Default.
*Plugins AAA Filters _ Custom\ Landscape.
Invert.
Effects \ 3D Effects \ Drop Shadow: 0 \ 0 \ 80 \ 40,00 _Color:
#000000 .
Selections\ Select none
Image \ Add Borders \ 1 pxl color #200800.
Aplicar a Marca D'agua.
Assine e salve.
Resize _Width 1000 pxls.
Aparecida \ licacida , setembro de 2022.
Espero que apreciem.
Obrigada!

:::...VOLTAR...:::
|