|
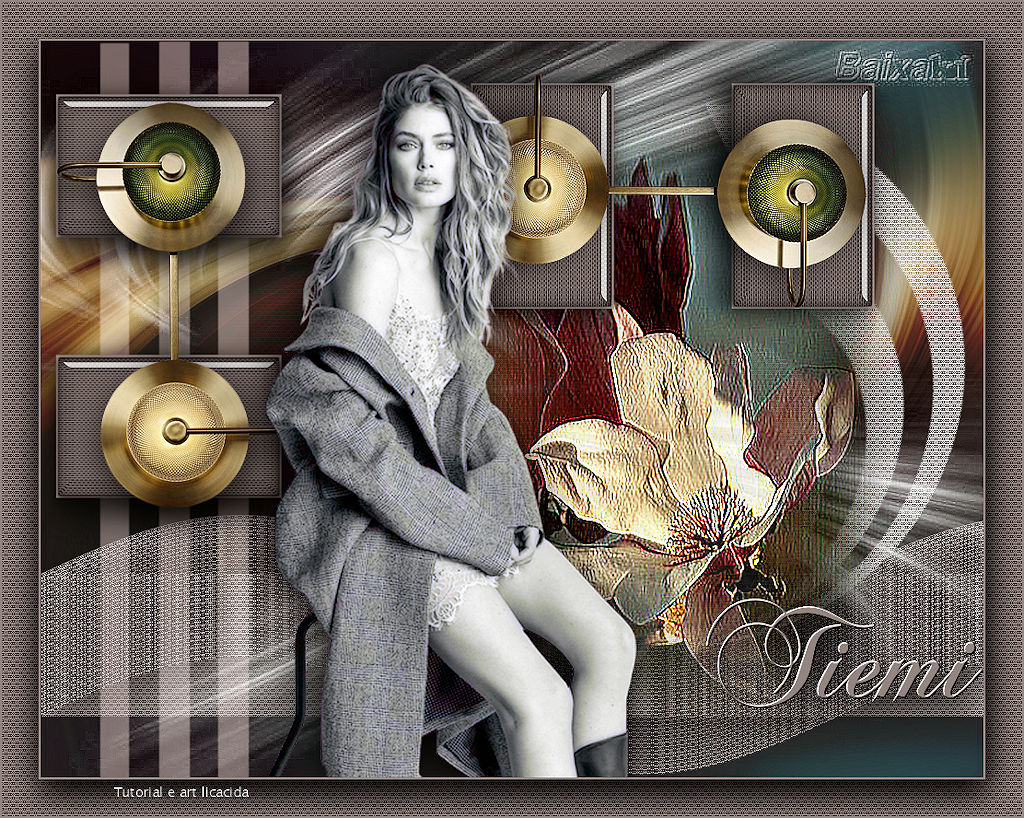
"Tiemi"
Material Aqui
Seleções: Imagem "alphachanneltieme " _ Seleção1_Seleção2_ Seleção3.
Guardadas em Canal Alpha a Imagem "tieme " .
Tubes:Callitubes-1962mulheres
Callitubes-34flores\Callitubes-186decor (1)
Mask : Silvie_Mask_Deco8DR
Texto :Título \lc
(Agradeço)
Marca D'água .
Efeitos do PSP.
Versão usada PSPX9.
Plugins
PluginsScreenWorks
MuRa's Meister \ Pole Transform
Plugins Nick Software
Tutorial
Configurar
Foreground #262120 \ Background #938681.
1-Abrir o
arquivo alphachanneltiemi.
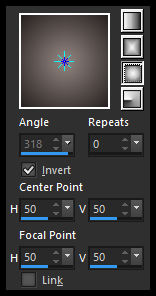
_Preencher com o gradiente Sunburst formado pelas cores configuradas
acima.
2-Selections \Select
All .Edit Copy no Callitubes-34flores \ Edit Paste Into Selection .
Selections\ Select none.
_Emboss3.
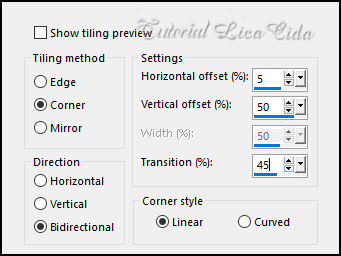
3-Effects \ Image Effects \ Seamless Tiling.
4-Adjust \Blur
\Radial Blur.
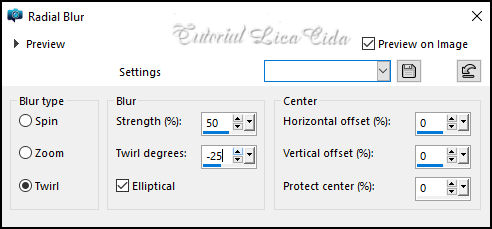
5-Effects\
Distortion Effects\ Twirl.
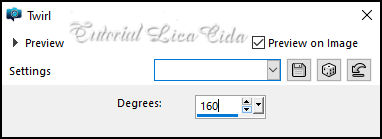
_Adjust \
Sharpness\Sharpen More.
6-Layers \ New Raster Layer.
_Repetir o gradiente formado no ítem 1.
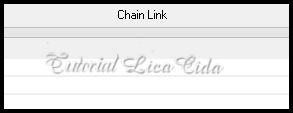
7-PluginsScreenWorks\Chain Link.
8-Layers \
Properties General: Blend Mode\ Overley.
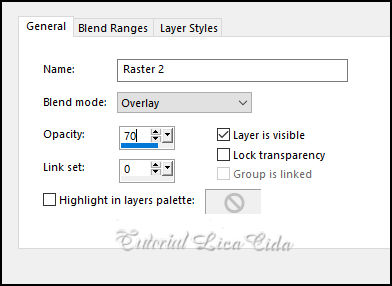
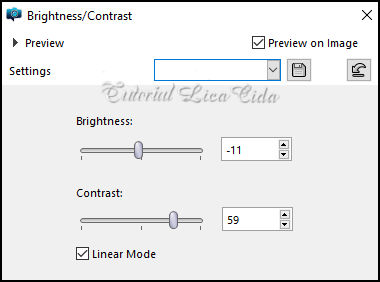
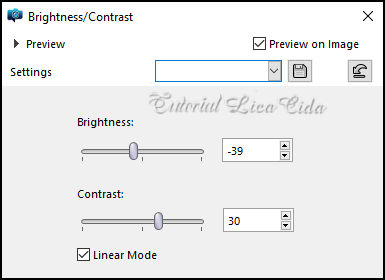
_Adjust \Brightness
and Contrast.
9-Selections \Load
\ Save Selection \Load Selection From AlphaChannel \ Selection#1.
10-Layers \ New Raster Layer.
_Preencher com a cor clara .
11-Selections \ Modify \ Contract 4 . Delete.
12-Layers \ New Raster Layer.
_Repetir a cor clara .
13-Plugins ScreenWorks\Chain Link.
( print acima, ítem 7)
14-_Plugins Alien Skin\ Eye Candy 5 Impact \ Glass _Clear ( ou outro
a gosto)
_Selections\ Select none.
_Layers\ Merge\ Merge Down.
_Effects \ 3D Effects \ Drop Shadow: 12\ 2\ 75\ 50,00 _Color:
#000000 .
_Image\Resize
60%
*Tirar a
visibilidade da layer, ( raster3 ). Vamos trabalhar depois.
15-Selections \Load \ Save Selection \Load Selection From
AlphaChannel \ Selection#2.
16-Layers \ New Raster Layer.
_Flood fill , Opacity 50%, preencher com a cor clara .
17-PluginsScreenWorks\Chain Link.
( print acima, ítem 7)
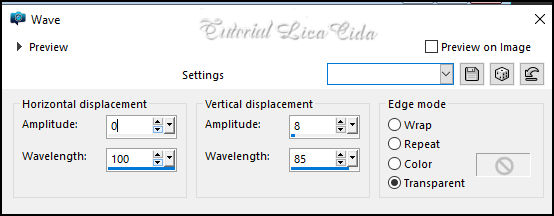
18-Effects\ Distortion Effects\ Wave.
Selections\
Select none.
19-Ferramenta Pick Tool _Position X 0_ Position Y 514.
_Tecle M para desativar a ferramenta
_Effects \ 3D Effects \ Drop Shadow: 12\ 2\ 75\ 50,00 _Color:
#000000 .
_Adjust \Brightness and Contrast.
_Blend Mode
Screen.
20-Selections \Load \ Save Selection \Load Selection From
AlphaChannel \ Selection#3.
21-Layers \ New Raster Layer.
_Flood fill , opacity 50% preencher com a cor clara .
Blend Mode Screen.
Selections\ Select none.
*Flood Fill\ Normalizar Opacity 100% .
_Layers , organizar.
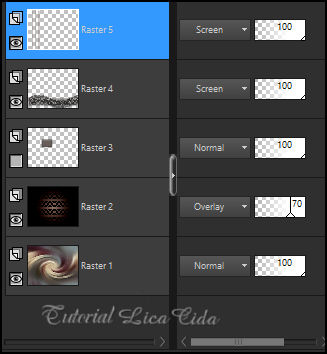
_Layers
Duplicate ( raster5).
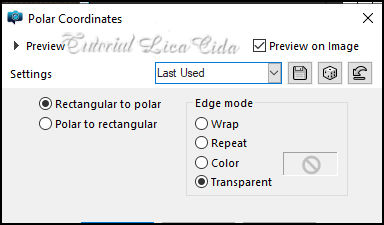
22-Effects\ Distortion Effects\ Polar Coordinates.
23- Plugins \
MuRa's Meister \ Pole Transform_Default
_ Image Mirror Horizontal.
24-Ferramenta Pick Tool _Position X 710_ Position Y 64
_Tecle M para desativar a ferramenta
25-PluginsScreenWorks\Chain Link.
( print acima,ítem 7 )
_Blend Mode Screen. Opacity ( use a gosto ).
26-Ativar a Layer Raster4.
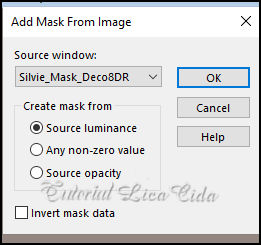
_ Layers \ New Raster Layer. Preencher color #ffffff.
_ Layers \ New Mask Layer \ From Image Silvie_Mask_Deco8DR.
Effects \ Edge
Effects \ Enhance. Layers \ Merge \ Merge Group.
*Plugins \ MuRa's Seamless \ Emboss at Alpha _Default.
*Abrir a visibilidade da Layer Raster3. Ativá-la.
_Layers \ Arrange \ Bring to Top.
27-Ferramenta Pick Tool _Position X -5 _ Position Y 44.
_Tecle M para desativar a ferramenta
_Effects \ 3D Effects \ Drop Shadow: 12\ 2\ 75\ 50,00 _Color:
#000000 .
_Layers Duplicate.
28-Ferramenta Pick Tool _Position X -5 _ Position Y 315 .
_Tecle M para desativar a ferramenta.
_Layers\ Merge\ Merge Down.
29-Edit Copy no Callitubes-186decor (1) \Paste As New Layer.
Posicione como modelo .
_Effects \ 3D Effects \ Drop Shadow: 12\ 2\ 75\ 50,00 _Color:
#000000 .
_Layers\ Merge\ Merge Down.
_Layers Duplicate.
30-Image\ Free Rotate
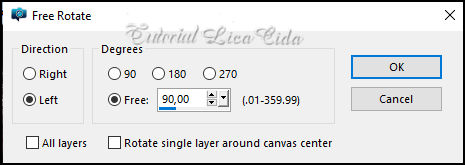
_ Image Mirror
Horizontal.
31--Edit Copy no Callitubes-34flores \Paste As New Layer.
_Emboss3 \repetir.
*Posicione abaixo da layer superior, use a gosto.
32-Edit Copy no Callitubes-1962mulheres\Paste As New Layer.
_Posicione.Use a gosto.
33-Plugins Nick Software\ Color EfexPro 3.0\Bi-Color Filters\ _Color
Set \Violet/Pink4. _Default.
_ Emboos3.
34- Edit \ Copy no titulo_"Tiemi"
Edit \ Paste as New Layer.
Posicione a gosto.
**PS- dupliquei os efeitos que quiz realçar.
Borders
_Image \ Add Borders \ 2pxls cor clara .
Selections \ Select All.
_Image \ Add Borders \ 40 pxls cor clara .
Invert.
_PluginsScreenWorks\Chain Link.
( print acima,ítem 7 )
Invert.
_Effects \ 3D Effects \ Drop Shadow: 12\ 2\ 75\ 50,00 _Color:
#000000 .
Repetir
Selections none.
_Image \ Add Borders \ 2pxls cor clara .
*Opcional: Plugins AAA Filters _ Custom\ Sharp
Aplicar a Marca D'agua.
Assine e salve.
Resize _Width 1024 pxls.
Aparecida \ licacida , junho de 2022.
Espero que gostem.
Obrigada!

:::...VOLTAR...:::
|