|
|
|
" Inspiring"
Preset inspiring _mp \ do Eye Candy 5/Impact/Motion
Trail...
(Dar duplo clic
sobre o preset para importar-lo ao Plugin).
Seleção: selinspiring_mp.PspSelection. ( Salve
em sua pasta de seleções My PSP Files ) . Tubes :
SuizaBella_Ref_AG-001134\SuizaBella_Ref_AG-001368.
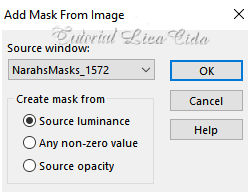
Mask:NarahsMasks_1572.
Deco:deco1_inspiring\ deco2_inspiring
\vzse17_by_vazsu-d98fs4k.
(Agradeço)
Marca D'água . Efeitos do PSP.
Versão usada
PSPX9.
Plugins
Plugin Simple
Plugin Mehdi
Plugin Carolaine
and Sensibility.
Plugin dsb flux.
Plugin MuRa's
Meister .
Tutorial _Roteiro 1-Abrir uma nova
imagem de 1000 x 700 .
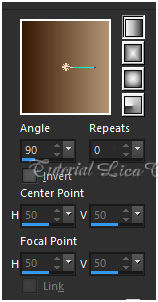
Preencher com o
gradiente formado pelas cores #361802( usar no foreground ) e #b29474
usar no background) Configurar Linear . Angle 90 e Repeats 0. Invert
desmarcado.
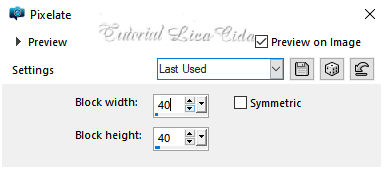
 2-Effects\ Distortion Effects\Pixelate.
 3-Plugin Simple \
Pizza Slice Mirror .
( aplicar duas vezes)
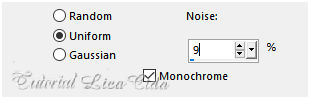
4- Adjust \ Add /
Remove Noise \ Add Noise.
 5-Plugin Medhi\
Sorting Tiles.
 6-Plugin
Simple \ Blintz.
_Effects \ Reflection
Effects \ Rotating Mirror ... 0 \180 _Reflect.
_Effects\ Edge Effects\
Enhance.
_Plugin \ MuRa'Seamless\
Emboss at Alpha_Default.
7-New Layer .
Preencher com a cor usada no
background (#b29474 ).
Aplicar a NarahsMasks_1572.
 _Effects\ Edge Effects\
Enhance.
Layer\Merge \Group.
8-Plugin Carolaine and
Sensibility \ CS-LDots...100 \3 \ 2.
Blend Mode Screen. Opacity a
gosto ( usei 67%) . 9-Selections \Load \ Save Selection \Load Selection From Disk \
Load \selinspiring .PspSelection.
New Layer.
Preecher com a cor usada
no background (#b29474 ).
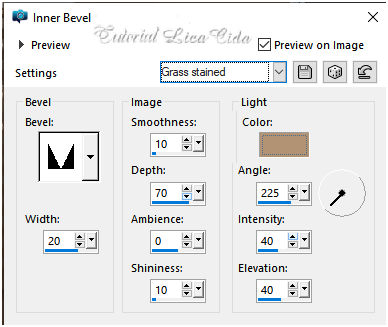
10-Effects\ 3DEffects\ Inner
Bevel ( Grass stained )
(cor usada no background.)
 Selections \Select none.
11-Plugin Alien Skin Eye Candy 5:
Impact\ Motion Trail... Setting\ use Setting\ inspiring .
12- Plugin dsb flux.
 Layers Duplicate\ Image Mirror
Vertical.
Layers\Merge\ Merge Down.
Layers Duplicate
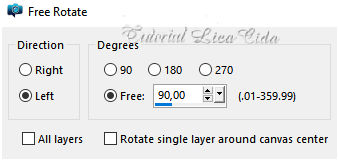
13-Image\ Free Rotate.
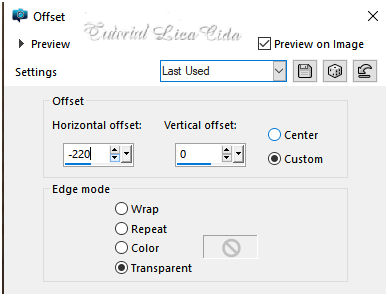
 _Effects\ Image Effects\
Offset.
 14-Plugin MuRa's
Meister \ Pole Transform.
 Layers Duplicate\ Image Mirror Horizontal.
Layers\Merge\ Merge Down.
*Layers\Arrange\ Move Down.
_Plugin \ MuRa'Seamless\ Emboss at Alpha_Default.
15-Raster2.
_Effects\ Geometric Effects\ Circle_Transparent.
16-Edit Copy no deco1_inspiring\ Paste As New Layer.
Blend Mode Screen. Opacity a gosto.
17-Edit Copy no deco2_inspiring\
Paste As New Layer.
Blend Mode Screen.
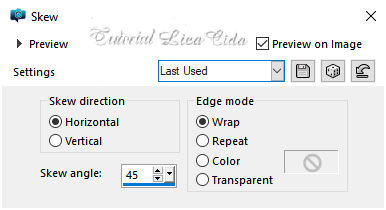
18- Effects\ Geometric Effects\
Skew...
 19- Duplicar a Raster1.
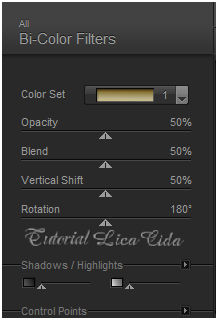
_Aplicar o Plugin Nick Software\ Color EfexPro
3.0\Bi-Color Filters.
Color Set\Brown1.
Blend Mode Overley.Opacity 77%.
 20- Duplicar a Raster Color
of Raster2.
_Aplicar o Plugin Nick Software\ Color EfexPro
3.0\Bi-Color Filters.
Color Set\Violet/Pink4 ( usar como
abrir )
Blend Mode Screen. Opacity 48%.
Layers\ Blends\ Opacitys.
use a gosto 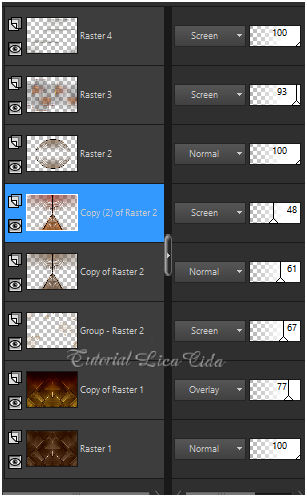 21-Ativar a Layer superior.
Raster4.
_Edit Copy no
vzse17_by_vazsu-d98fs4k ( raster2)\ Paste As New Layer.
Opcional.
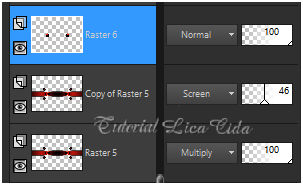
*Para o deco chegar mais ou menos no
tom que eu desejava, dupliquei e usei o Blende Mode Screen, Opacity 46%.
Na layer inferior usei o Blend Mode
Multiply.
Copiar_Colar como nova layer o botom
do deco. (Raster3)
_Effects\ Image Effects\ Offset.
-200 \ 0 Transparent ( Custom
marcado ).
_Duplicate\ Mirror Horizontal.
Layer\ Merge Down.
 22-Edit Copy no tube SuizaBella_Ref_AG-001134\ Paste As
New Layer .
Resize 80%
_ Adjust\ One Step Photo Fix.
_ Ativar a Raster6.
Layers\ Arrange\ Bring to Top.
23-Image add borderes 1 pxl color ( fore) \
Image add borderes 2 pxls color ( back )\
Image add borderes 1 pxl color( fore).
Selections\ Select All. 24-Image add borderes 40
pxls color( back ).
_ Effects \ 3D Effects \ Drop
Shadow 0\ 0\ 80\ 40,00. Color=#000000.
Selections\ Select All.
25-Image add borderes 50 pxls color ( fore).
Invert
26-Filters Unlimited 2 \ Special Effects 1 .
 Invert
Effects \ 3D Effects \ Drop Shadow 0\ 0\ 80\ 40,00.
Color=#000000.
Selections\ Select none.
22-Edit Copy no tube SuizaBella_Ref_AG-001368\ Paste As
New Layer .
Resize 60%
Image\ Mirror Horizontal.
Posicione.
* Resize \ Width 1000 pxls.
Aplicar a Marca D'agua.
Assine e Salve JPG
Aparecida\lica _Janeiro de
2021.
Espero
que apreciem,
obrigada!
 |