
|
|
|
"Surprised"
Seleções:
seltriangulolc.PspSelection. \selcirculolc.PspSelection. \selquadradolc.PspSelection.
( Salve em sua pasta de
seleções My PSP Files ) .
Preset katrina _mp \ do Eye Candy
5/Impact/Glass.
(Dar duplo clic sobre o preset para
importar-lo ao Plugin). Tubes
: Jeanne_Woman_14_09_2020 \
Jeanne_Deko_Grijze_Vase_06_10_2018.
Masks:
maskcameron ( arquivo net ) \Narah_mask_0670.
(Agradeço)
Marca
D'água . Efeitos do PSP.
Versão
usada PSPX9
Plugins
Plugin
\It@lian Editors Effect
Plugin \
Mehdi
Plugin Eye Candy 5 Impact.
Plugin MuRa's Meister.
Tutorial _Roteiro
1-Abrir nova imagem transparente de 1000 x
700.
Preencher com o
gradiente formado pelas cores #152735 ( usar no foreground
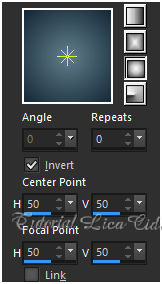
) e #617f8b( usar no background) .Configurar Sunburst
. Repeats 0. Invert marcado.CP=HeV, 50 \ FP=HeV,
50.
 2-Selections \Load \ Save Selection \ Load Selection From
Disk \ Load \ seltriangulolc.PspSelection.
_New layer.
_Preencher color
#ffffff.
3-Selections \Modify \Contract...
3pxls. Delete.
Selections\ Select
none.
_Layers Duplicate. Resize 80%
_Layers\ Merge
Down.
4-Com a ferramenta Magic Wand _
Default, selecionar a borda formada.
Flood Fill \ opacity 30%\
color #ffffff.
_Preencher a seleção.
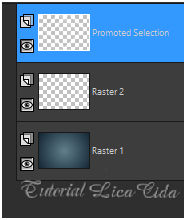
5-Ainda selecionado...
Promote Selection to Layer.
Selections\ Select
none.
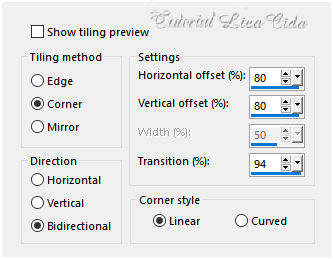
_Effects \ Image
Effects \ Seamless Tiling...
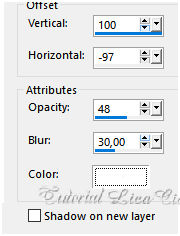
6-Effects\3D Effects\ Drop
Shadow.
Color
#ffffff
 _Effects\ Edge Effects\ Enhance More.
_Layers Duplicate \ Image Mirror Horizontal.
_Layers\ Merge
Down.
layers estão
assim.
7-Ativar a raster
2.
Layers Duplicate.
Resize 20%
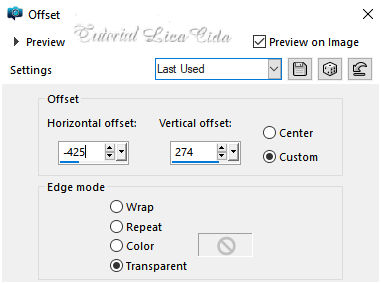
_Effects\ Image Effects\
Offset.
Com a ferramenta Magic Wand _ Default,
selecionar o triângulo.
Flood Fill \ opacity 30%\
color #ffffff.
_Preencher a seleção.
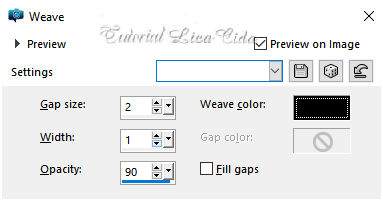
8-Effects\ Texture
Effects\
Weave.
Selections\ Select
none.
*Plugin
Alien Skin Eye Candy 5 : Impact\ Perspective
Shadow_Blurry.
_Effects
\Reflection Effects \ Rotating
Mirror .
0\180_Reflect.
_Layers\ Merge
Down.
9- Voltar à layer Promoted
Selection.
_Plugin Graphics Plus\ Vertical
Mirror_Default. ( 128\0 )
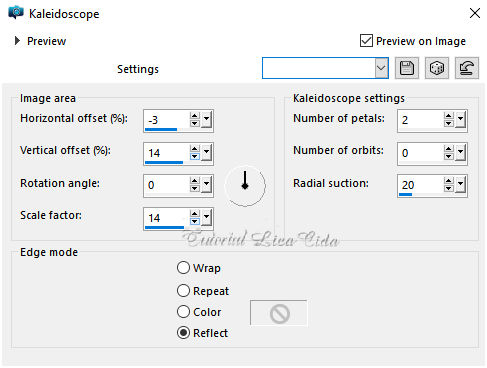
10-Effects
\Reflection
Effects \ Kaleidoscope .
 11-Selections \Load \ Save
Selection \ Load Selection From Disk \ Load \
selcirculolc.PspSelection.
* Promote Selection to
Layer
_Effects\3D Effects\ Drop Shadow.0\ 0\ 80\
40,00 . (Color=#000000).
12-Selections \Modify \Contract...
10pxls.
_Effects\3D Effects\ Drop Shadow.0\ 0\ 80\
40,00 . (Color=#000000). 13-Selections \Modify \Contract...
10pxls.
_Plugin
Alien Skin Eye Candy 5: Impact\ Glass... Setting\ use
Setting\ katrina.
Selections\ Select
none.
Layers Duplicate.
Resize 20%
_Effects\ Image Effects\
Offset.
( mesmos valores acima
)
_Effects
\Reflection Effects \ Rotating
Mirror .
0\180_Reflect.
_Layers\ Merge Down
( aplicar três
vezes).
14-New layer ( raster3
).
Layers\ Arrange\ Move
Down.
Preencher com a color do
background ( opacity 100%)
_Aplicar a mask
maskcameron.
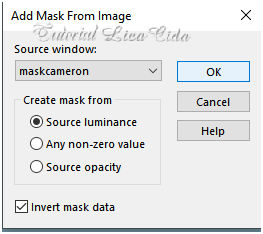 Layers\ Merge Group.
_Effects
\Reflection Effects \ Rotating
Mirror .
0\180_Reflect.
15-Selections \Load \ Save Selection \ Load
Selection From Disk \ Load \
selquadradolc.PspSelection.
Delete
Selections\ Select
none.
*Plugin
Alien Skin Eye Candy 5 : Impact\ Perspective
Shadow_Blurry.
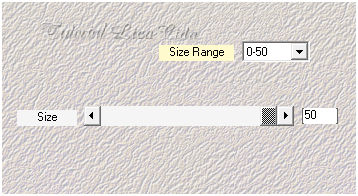
16-Effects\ Texture Effects\
Weave.
(valores
iguais, veja print acima )
17-
Raster2.
Seleção
Personalizada ( tecle S
)
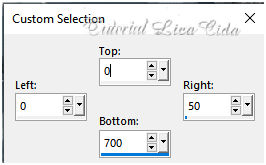
* Promote Selection to
Layer.
Selections\ Select
none.
18- Plugin \It@lian Editors
Effect \ Effetto Fantasma_ 21-
21.
_Effects\ Edge Effects\ Enhance
More.
_Effects\
Texture Effects\
Weave.
(valores
iguais, veja print acima )
*Plugin Alien Skin Eye Candy 5 : Impact\ Perspective Shadow_Blurry ( opcional) 19-New layer ( raster3 ). Flood Fill \ opacity 50%\
color #ffffff.
_Preencher a layer.
_Aplicar a
Narah_mask_0570.
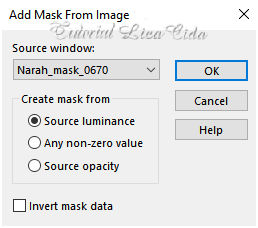 Layers\ Merge Group.
_Layers Duplicate \ Image Mirror
Vertical.
20- Plugin \ Mehdi
\Weaver.
_Effects\ Edge Effects\
Enhance.
_Layers\ Merge
Down.
_Plugin \ MuRa's Seamless \
Emboss at
Alpha _Default.
21-Ativar a
raster1.
Layers Duplicate.
_Plugin MuRa's Meister \
Perspective Tiling . Height
18.
_Effects \ Image
Effects \ Seamless Tiling... ( print
acima)
_Emboss3.
Layers\ Arrange\ Move
Up.
22-Volto à
raster1.
_Plugin \ L en K's _Zitah _Default.
*Raster2\ Layers Arrange Bring to
Top.
layers\blends\opacitys
use a
gosto
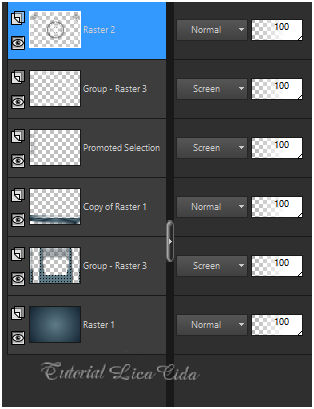 _Image Add Borders 2 pxls color = foreground \ Image Add Borders 2 pxls color = background \ Image Add Borders 2 pxls color = foreground. Selections \Select All. _Image \ Add Borders \ 40 pxls color = #ffffff \ Effects\3D Effects\ Drop Shadow.0\ 0\ 80\ 40,00 . (Color=#000000). Selections\ Select none.
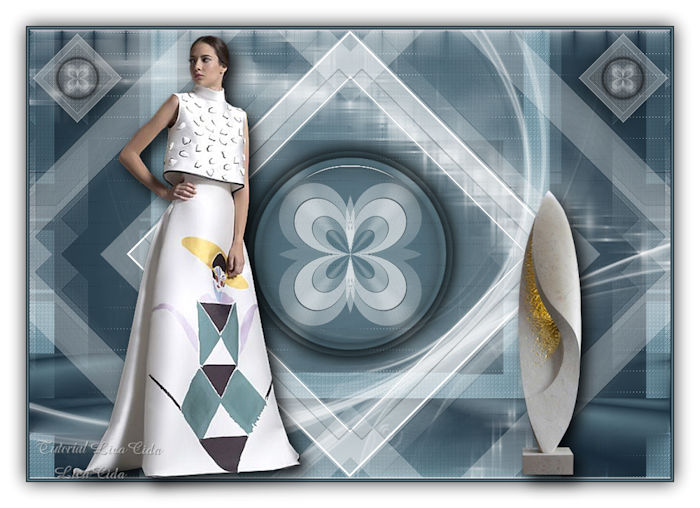
23-Edit Copy no
Jeanne_Woman_14_09_2020 \ Paste As New Layer.
Posicione e use a
gosto
24-Edit Copy no
Jeanne_Deko_Grijze_Vase_06_10_2018 \ Paste As New Layer.
Use a
gosto.
Assine e
salve.
* Resize \ Width 1000
pxls Aplicar
a Marca D'agua.
Aparecida \ licacida , novembro de
2020.
27
Espero que gostem.
Obrigada!
  |