|
|
|
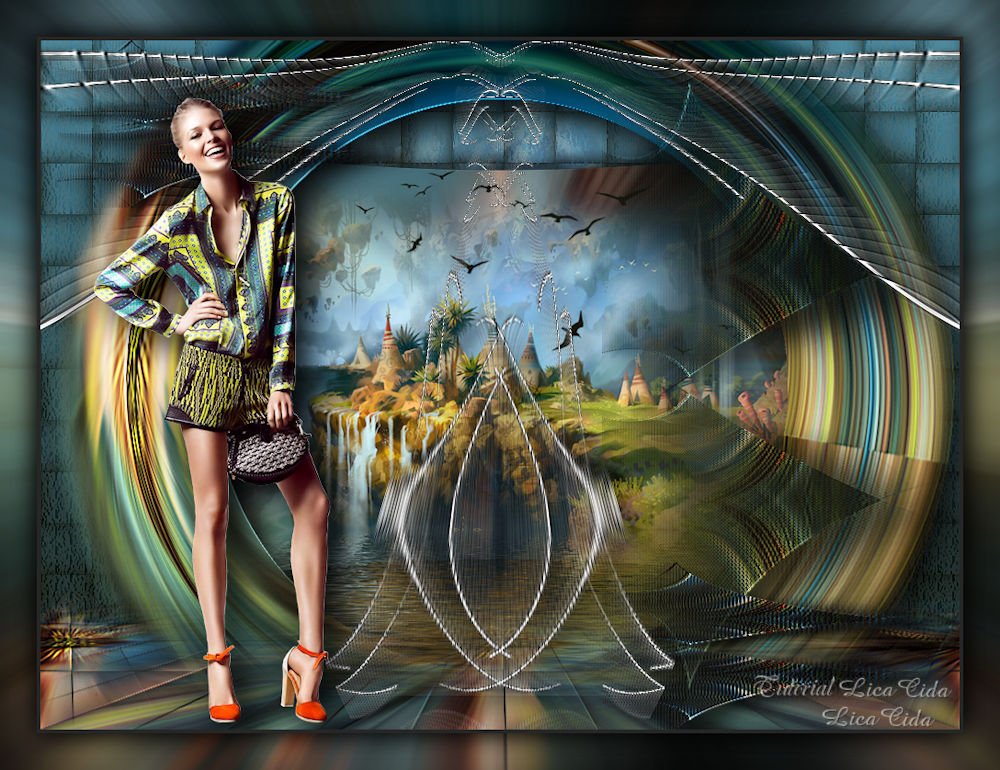
" Sedutora "
Tubes : Femme jewel 0013\Paysage misted jewel 043\aves-arquivo. Masks: !!!!.mask.ket-fadesuave\ 20-20. Deco: deco1\ deco2. (Agradeço)
Marca
D'água . Efeitos do PSP.
Versão usada PSPX9.
Plugins
Plugin Artistic.
Plugin MuRa'S Meister .
Plugin
Flaming Pear.
Tutorial _Roteiro
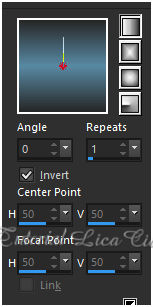
1-Abrir uma nova imagem de 1000 x 700 .
Preencher com o
gradiente formado pelas cores #5989a3 ( usar no
foreground ) e #272727( usar no
background) Configurar Linear . Angle 0 e
Repeats 1. Invert marcado.
 2-Selections\
Selection All. Edit Copy Femme jewel 0013 \ Edit Paste
Into Selection .
Selections\ Select none.
_Effects \ Image Effects \
Seamless
Tiling_Default.
Transition ( % )
:100.
3-Adjust\ Blur\Radial
Blur...
 _Layers Duplicate. Resize 80%
_Effects\3D Effects\
Drop Shadow 0\ 0\ 80\ 40,00 . Color=#000000.
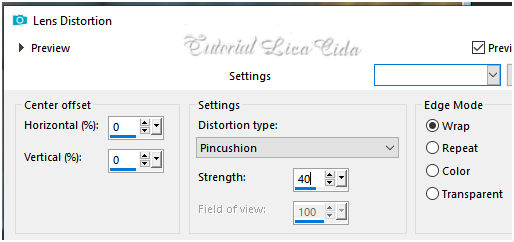
4-Effects\ Distortion Effects\Lens
Distortion.
 5-
Raster1.
_Layers Duplicate. Image Mirror
Vertical.
Blend
Mode_Overley.
Layers\ Merge\ Merge
Down.
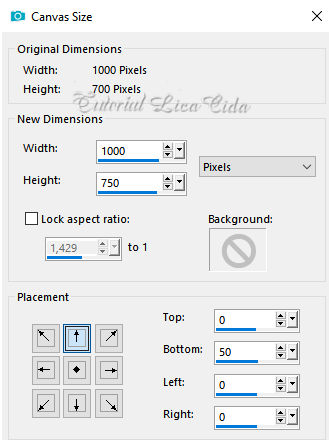
6- Image\ Canvas
Size...
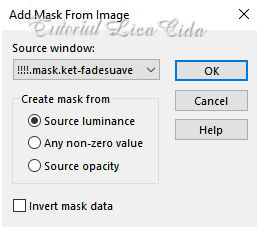
 7- Aplicar a
mask .ket-fadesuave.
 Duplicate . Layers Merge
Group.
_Layers
Duplicate.
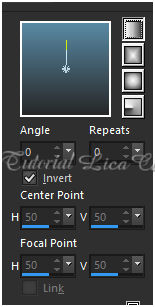
8-Plugin MuRa's Meister, Pole
Transform...
 9-Aplicar a mask .ket-fadesuave
( print ítem
7).
Duplicate . Layers Merge
Group.
Emboss3.
10-New Layers\Send to
Bottom.
Preencher com o
gradiente formado acima. Mudar: Repeats 0.
11- Abrir a Paysage misted jewel
043 e aplicar a mask 20-20 ( anexada nos materiais )
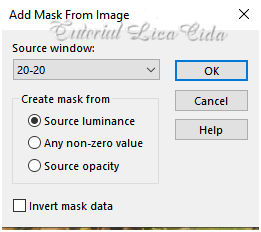
._Selections\ Selection
All. Edit Copy no Paysage misted jewel 043 ( com a mask
aplicada) \
Edit Paste Into
Selection .Selections\ Select none.
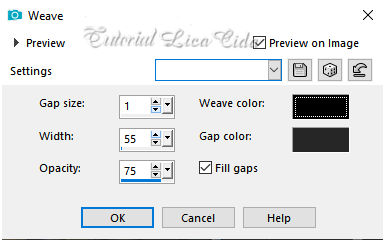
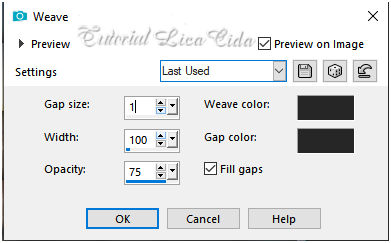
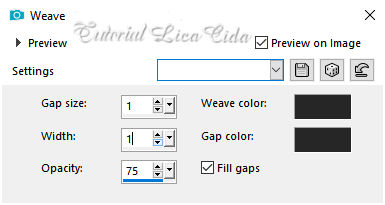
12-Effects\ Texture Effects\ Weave.
usar color
backgrond
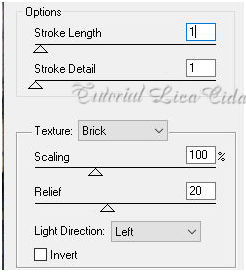
 13-Plugin Artistic \ Rough
Pastels
.
 14-Ativar a layer superior (
group-raster1
).
Effects\ Texture Effects\
Weave.
usar color
backgrond.
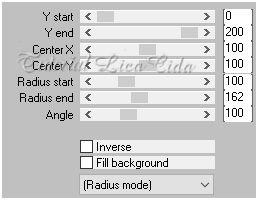
 15- Plugin MuRa's Meister \
Perspective Tiling_Height20 ( demais valores
iguais).
_Effects \ Image Effects \
Seamless Tiling_Side by
side
Emboss3
*Com a Ferramenta Magic Wand \ Feather 60 \ Clique na parte transparente . Deletar ( tres\quatro vezes _ para suavizar o efeito. ). Selections \ Select none. 16-Ativar a Layer Copy of
Raster1.
Edit Copy no Paysage misted jewel
043\ Paste As New Layer.
Resize 80% + 80%
_Plugin \
MuRa'Seamless\ Emboss at Alpha_Default
.
17-Edit Copy nas aves (
arquivo) \ Paste As New Layer.
Posicione.
Layers\ Merge\ Merge
Down.
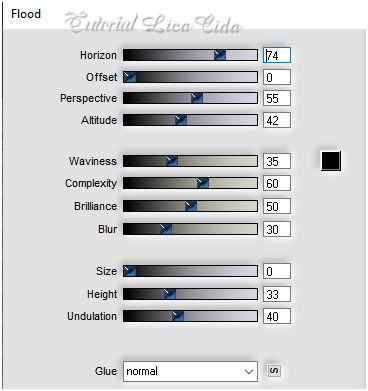
18-Plugin Flaming
Pear\
Flood.
 Layers Merge Down. Layers
Arrange Move
Down.
Resize 90%
*Plugin Alien Skin Eye Candy 5 :
Impact\ Perspective
Shadow_Blurry.
19-Aplicar
a mask .ket-fadesuave ( print ítem 7).
Layers Merge
Group. _aplicar na layer superior (Pole
Transform...
*Plugin Alien Skin Eye Candy 5 :
Impact\ Perspective
Shadow_Blurry.
20- Estou na layer
superior:
Seleção Personalizada ( tecle
S).
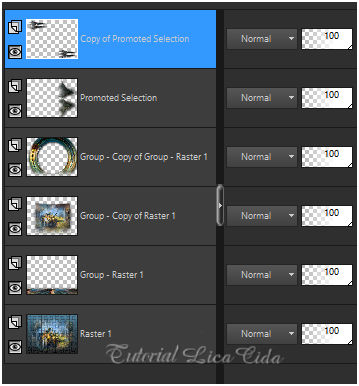
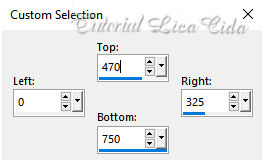 Promote Selection to Layer. Selections \ Select none.
21-Effects\ Texture Effects\
Weave.
usar color
backgrond.
 22- Plugin VanDerLee \ UnPlugged-X
v2.0 _ Vertical
Tile.
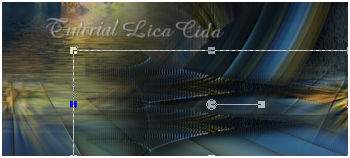
23- Effects\ Geometric Effects\
Skew.
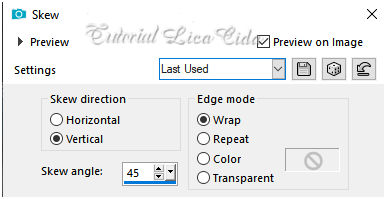 Layers Duplicate\
Image Mirror Vertical .
Blend Mode =Overley. Layers Merge
Down.
Image\ Mirror
Horizontal.
*Plugin Alien Skin Eye Candy 5 :
Impact\ Perspective
Shadow_Blurry.
Emboss3
24- Effects\ Distortion Effects\
Pinch...S (%):
100.
Layers Duplicate
_ Usando a Ferramenta Pick vire o
efeito como
modelo.
 Emboss3.
Layers Duplicate.
25- Plugin Simple Half
Wrap.
Objects\ Align Top. Objects\ Align
Left.
Layers Merge
Down
26-Aplicar na layer do Pole
Transform...
Plugin Nick Software\ Color EfexPro
3.0\ Bi-Color Filters.
Color Set\ Moss3_Default ( use a
gosto ).
_Em outras layers ;
opcional.
Layers\ Blends\
Opacitys.
 27-Edit Copy no deco1
\Paste As New
Layer.
Objects\ Align
Top.
27-Edit Copy no deco2
\Paste As New
Layer.
Objects\ Align
Bottom. 28-Edit Copy no Femme jewel
0013 \Paste As New
Layer.
Resize e posicionamento a
gosto.
*Image add borderes 4
pxls\ ( color background
).
Edit Copy *Image add borderes 40 pxls\ ( color foreground ). Selecione \ Edit Paste Into Selection. Adjust\ Blur\Radial Blur...( print ítem3_ _Plugin Graphics Plus\ Cross
Shadow_Default.
Invert
_Effects\3D Effects\
Drop Shadow 0\ 0\ 80\ 40,00 . Color=#000000. Selections\ Select
none.
* Resize \ Width 1000 pxls. Aplicar
a Marca D'agua.
Assine e
salve. Aparecida \ licacida , julho de 2020.
17
Espero que gostem.
Obrigada.   |