|
|
|
" Nines " Carinhosamente!
* Seleção:
selcirculocentrallc.PspSelection.
( Salve em
sua pasta de seleções My PSP Files ) .
* Preset flowers _mp \ do Eye Candy
5/Impact/Glass.
(Dar duplo clic sobre o preset para
importar-lo ao Plugin).
*Back:fondo-abstracto-moderno-linea-oro_67845-875. *Gradiente
:Metal brass (Corel_06_017)
*Deco:
decoraster4
*Tubes : SuizaBella_Ref_AG-00906
\2136-luzcristina.
(Agradeço)
*Marca D'água . Efeitos do PSP.
Versão usada PSPX9.
Plugins
Plugin Alien Skin Eye Candy 5:
Impact.
Plugin MuRa'S Meister
Tutorial _Roteiro
Configurar
Foreground #ccd5c5 \ Background
#445c4f
1-Abrir nova imagem transparente de 1000 x 700.
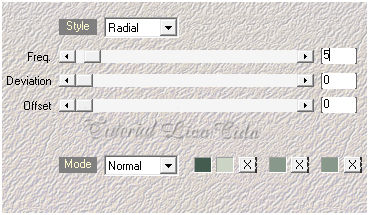
_Plugin Mehdi\ Wavy Lab.1.1
#445c4f \ #ccd5c5 \ #88988a \ #88988a.
 _Adjust\ Blur\ Gaussian Blur...R=38,00.
2- New Layers.
Selections\ Selection All. Edit
Copy no fondo-abstracto-moderno-linea-oro_67845-875\ Edit
Paste Into Selection . Selections\ Select none.
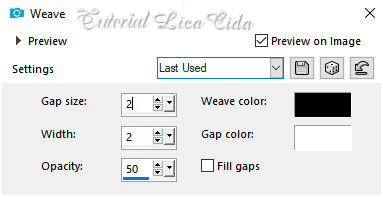
3- Effects\ Texture Effects\ Weave.
 Layers Duplicate.
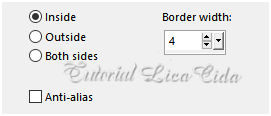
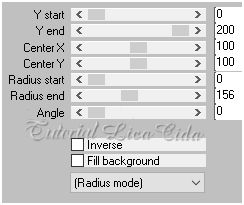
4-Selections\ Selection
All. Selections \Modify \Contract...
40pxls.
5-Selections \Modify \Select
Selection Borders...
 6-New
Layers.
Preencher com o Gradiente Metal
brass ( anexado nos materiais) . Configurar Linear . Angle 0\ Repeats
0. Invert desmarcado.
7- Effects\ 3D Effects Inner
Bevel.
 _Selections\ Select
none.
Layers\ Merge Down.
8-Plugin MuRa's
Meister \ Perspective Tiling. Height 20. Demais valores
default.
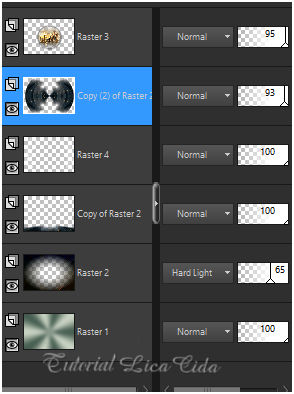
*Com a Ferramenta Magic Wand \ Feather 60 \ Clique na parte transparente . Deletar ( quatro-cinco \ vezes_ para suavizar o efeito ). Selections \ Select none. _Plugin \ MuRa'Seamless\ Emboss at Alpha_Default. 9-New Layers (
raster3).
Selections \Load \ Save Selection \ Load Selection
From Disk \ Load
\selcirculocentrallc.PspSelection.
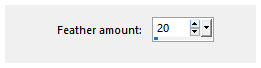
10-Selections \Modify \Feather
20.
 11-Plugin Alien Skin Eye Candy 5: Impact\
Glass... Setting\ use Setting\ flowers
.
_Effects\3D Effects\ Drop Shadow 2\ 10\ 80\
10,00 . Color=#000000.
repetir negativo :
V(menos)-2 \ H(menos)
-10
12-New
Layers.
Edit Copy no
misted 2136-luzcristina\ Edit Paste Into Selection . Selections\
Select
none.
_Adjust\ Sharpness\Sharpen
More.
Layers\ Merge
Down.
13- Ativar a Copy of
Raster2.
Layers Duplicate \
Image\ Rotate
Right.
_Plugin MuRa's Meister\
Pole
Transform...
 Layers Duplicate\ Image
Mirror
Horizontal.
Layers\ Merge
Down.
Layers Duplicate\ Image
Mirror
Vertical.
Layers\ Merge
Down. _Image\
Rotate
Left.
_Effects\3D
Effects\ Drop Shadow 2\ 10\ 80\ 10,00 . Color=#000000.
repetir negativo :
V(menos)-2 \ H(menos)
-10
14-Voltar a Copy of
Raster2.
Edit Copy no decoraster4\
Paste As New
Layer.
15-Raster2.
Plugin Nick Software\ Color EfexPro
3.0\ Bi-Color User
Defined_Default.
Blend Mode= Hard Light. Opacipy
65%.
Layers\ Blends\
Opacitys
(Use a gosto
)
 16-Image \ Add
Borders \ 1 pxl color
background.
Copy.
17-Image \ Add
Borders \ 40 pxls color =
#ffffff.
Selecione.
18- Edit Paste Into
Selection a imagem
copiada.
_Adjust\ Blur\ Gaussian
Blur...R=38,00.
19-Effects\ Texture Effects\
Weave.
( print ítem
3).
_Plugin Graphics Plus\ Cross
Shadow_Default.
Invert
_Effects\3D
Effects\ Drop Shadow 0\ 0\ 80\ 40,00 . Color=#000000.
Selections \ Select
none.
20-Plugin AAA Frames\ Foto
Frame.
Widh20_demais valores
default.
(
repetir)
21-Edit Copy no
tubeSuizaBella_Ref_AG-00906\ Paste As New
Layer.
Resize 80% + 90%
_Adjust\ Sharpness\Sharpen .
_Adjust\ One Step Photo Fix (
opcional).
22-Image \ Add
Borders \ 1 pxl color
background.´´ _ Resize \ Width 1000
pxls.
Aplicar a Marca D'agua.
Assine e
salve. Aparecida \ licacida , maio de
2020.
11
Espero que gostem.
Obrigada!
 |
